Saturday, March 27, 2010

VMware announced vSphere 4.0 Hardening Guide Public Draft Release

Source  : VMware Security Blog
VMware would like to announce the availability of a public draft for the vSphere 4.0 Security Hardening Guide.  This guide represents a new approach to providing security guidance from VMware. As compared with the previous VI3 Hardening Guides, the current guide has the following highlights

  • Structure: this version uses a standardized format, with formally defined sections, templates, and reference codes.  The goal is to increase clarity and reduce ambiguity, make it easier to reference individual guidelines, and most of all, enhance the ability to automate guideline enforcement.
  • Recommendation levels: in following with the formats used by NIST, CIS, and others, this guide categorizes all guidelines into three security levels.  Instead of recommending a single set of guidelines for all environments, this guide encourages more of a risk-based approach, so that individual administrators can decide which guidelines apply to their environment.
Overall, there are more than 100 guidelines. The guide itself is split into the following major sections: (PDF below)

Howmany VCP's are there in Market till now? and New VMware VCP Logo Released

 
Article Source : www.simonlong.co.uk
As you can see VMware now have a new VCP Logo. The new VCP logo has been placed out on the VCP section of the Website for you to download.

Some other VCP news from VMware:
We currently have over 53,000 VCPs, of which over 15,000 are VCP4s.  The second number is rapidly increasing since the launch of the VCP4 certification in the 3rd quarter of 2009.  Think about it, 6 months into the certification and we already have 15,000 VCP4s! 
 With that many VCP's I think it's about time I started working towards my VCDX Exams.

While changing Preferred Path on Storage Adapter --> Unable to cast object of type ‘LogicalUnitPolicy’ to type ‘FixedLogicalUnitPolicy’

 
Source - http://www.simonlong.co.uk/
When trying to change the Preferred Path on Storage Adapter I was greeted with the following Error message
Unable to cast object of type ‘LogicalUnitPolicy’ to type ‘FixedLogicalUnitPolicy’
I checked my other Storage Adapters and these too gave me the same error.
The Fix
To fix this problem all you need to do is Rescan the Storage Adaptors using the following steps
  1. In the vSphere Client, select the Host which has the Storage Adaptors that are giving you the error and click the Configuration tab.
  2. In the Hardware panel, select Storage Adapters
  3. Select one of your Storage Adaptors and click Rescan above the Storage Adapters panel.
  4. Perform Step 3 for the rest of your Storage Adapters.

When you Power on a VM --> Error "The object has already been deleted or has not been completely created"

Problem (Article source -- http://www.simonlong.co.uk)
When trying to Power On an old VM I was greeted with this message:

I checked the Datastore and everything seemed to be present and correct. I tried to migrate the VM to a different Host, but again I was shown this error. A quick Google didn't show up anything useful so I decided to check the logs.
running the command  tail /var/log/vmware/hostd.log -f whist trying to Power On the VM flagged these error messages:
  • [2010-03-24 12:11:10.547 'BaseLibs' 129907632 info] readlink /var/run/vmware/7f0f49adb5092b09694cdf456a488d6c: No such file or directory
  • [2010-03-24 12:11:10.547 'BaseLibs' 129907632 info] readlink /var/run/vmware/%2fvmfs%2fvolumes%2f4ad45c8d%2ddb2eadd5%2d411f%2d00237d3c8b86%2fTEST%2dVWB01%2fTEST%2dVWB01%2evmx: No such file or directory
Solution

Remove the troubled Virtual Machine from the Inventory:
  • Display the virtual machine in the inventory.
  • Right-click the virtual machine and select Remove from Inventory.
  • To confirm that you want to remove the virtual machine from the inventory, click OK.
Re-add the Virtual Machine back into vCenter:
  • Browse the datastore where the VM's files are located
  • Right Click on the VM's .vmx file and select Add to Inventory
  • Follow the Wizard
Once you can see the VM in vCenter, try and power it on. Hopefully this should have fixed your issue.

APD (All Paths Dead) --> important vSphere 4 storage bug is solved in patch ESX400-200912401-BG

Article Source from xtravirt.com

Chad Sakac over at http://virtualgeek.typepad.com already blogged about the APD bug in December last year. You can find his post here.

Just a short quote from Chad his post about the symptoms of this APD bug:
Recently saw a little uptick (still a small number) in customers running into a specific issue – and I wanted to share the symptom and resolution.   Common behavior:
  • They want to remove a LUN from a vSphere 4 cluster
  • They move or Storage vMotion the VMs off the datastore who is being removed (otherwise, the VMs would hard crash if you just yank out the datastore)
  • After removing the LUN, VMs on OTHER datastores would become unavailable (not crashing, but becoming periodically unavailable on the network)
  • the ESX logs would show a series of errors starting with “NMP”
Examples of the error messages include:
    “NMP: nmp_DeviceAttemptFailover: Retry world failover device "naa._______________" – failed to issue command due to Not found (APD)” “NMP: nmp_DeviceUpdatePathStates: Activated path "NULL" for NMP device "naa.__________________".
What a weird one…   I also found that this was affecting multiple storage vendors (suggesting an ESX-side issue).  You can see the VMTN thread on this here.
We found out about this issue during a big storage project. We where creating a lot of new LUNs and where removing a lot of the old LUNs. If you remove a LUN on a way not mentioned in Chad his post:
This workaround falls under “operational excellence”.   The sequence of operations here is important – the issue only occurs if the LUN is removed while the datastore and disk device are expected by the ESX host.   The correct sequence for removing a LUN backing a datastore.
  • In the vSphere client, vacate the VMs from the datastore being removed (migrate or Storage vMotion)
  • In the vSphere client, remove the Datastore
  • In the vSphere client, remove the storage device
  • Only then, in your array management tool remove the LUN from the host.
  • In the vSphere client, rescan the bus.
So when we used the workaround described above, everything went fine. But at my current employer, we use a large LeftHand iSCSI SAN.  One of the great things of Lefthand SAN is the ability to move LUNs between different clusters. With the APD bug, we couldn’t use this option anymore.
When we discovered this APD bug we contacted VMware Support. After a couple of weeks we received an e-mail with the following fix.
I can now confirm that the APD (All paths dead) issue has been resolved by a patch released as part of P03.
To install this patch, please upgrade your hosts to vSphere Update 1 and use Update Manager to install the latest patches.
Please ensure that ESX400-200912401-BG is installed as this resolves the APD problem
We upgraded one of our clusters to Update 1 and installed the latest patches including the ESX400-200912401-BG patch. After installing the patch, we did some tests and I can confirm that the APD bug is history!!

For Step-by-Step Upgrade Sequence Guide on how to update APD patch? - Click This Link

More info about the patch can be found here:
For the readers who cannot upgrade to vSphere Update 1 and the latest patches, you can find some workarounds here on below:

VMDirectPath (ESX 4 Onwards it's mostly on GUI --> Configuration Examples and Troubleshooting

Now working with Tape Drives, Libraries & 10Gbps devices,
direct from VM's (not from ESX) is piece of cake..

VMware made it more easier through GUI - you don't need to make your hands dirty by editing .VMX.

However, be prepared for few special cases - need to edit .VMX again.

Configuring VMDirectPath I/O pass-through devices on an ESX host - Extract from VMware KB - 1010789 - Click this for link

Purpose

This article provides steps for configuring VMDirectPath I/O direct PCI device connections for virtual machines running on Intel Weybridge and Stoakley platforms.

Resolution


About VMDirectPath I/O pass-through devices

You can connect up to two passthrough devices to a virtual machine. When selecting the devices, keep in mind these restrictions:
  • Devices cannot be plugged in after a PCI Bridge.

  • You cannot have two devices in two different contexts (for example, one used by VMkernel and one in pass-through) using the same PCI slot. For example, the dual head NIC is dedicated to the VMkernel OR is available for pass-through. If you select one, the other is automatically selected as well. A dialog informs you why this occurred.

Configuring pass-through devices

To configure pass-through devices on an ESX host:
  1. Select an ESX host from the Inventory panel of VMware Infrastructure (VI) Client.
  2. On the Configuration tab, click Advanced SettingsThe Pass-through Configuration page lists all available pass-through devices.

    Note:
    A green icon indicates that a device is enabled and active. An orange icon indicates that the state of the device has changed and the host must be rebooted before the device can be used.

  3. Click Edit.
  4. Select the devices and click OK.

    Note:
    If you have a chipset with VT-d, when you click Advanced Settings in VI Client, you can select what devices are dedicated to the VMDirectPath I/O.
  5. When the devices are selected, they are marked with an orange icon. Reboot for the change to take effect. After rebooting, the devices are marked with a green icon and are enabled.

    Note: The configuration changes are saved in the /etc/vmware/esx.conf file. The parent PCI bridge, and if two devices are under the same PCI bridge, only one entry is recorded.
    The PCI slot number where the device was connected is 00:0b:0. It is recorded as:

    /device/000:11.0/owner = "passthru"

    Note:
    0b is 11 in decimal.
To configure a PCI device on a virtual machine:
  1. From the Inventory in VI Client, right-click the virtual machine and choose Edit Settings.
  2. Click the Hardware tab.
  3. Click Add.
  4. Choose the PCI Device.
  5. Click Next.

    Note:
    When the device is assigned, the virtual machine must have a memory reservation for the full configured memory size.

Additional Information

For related information, see the VMDirectPath Tech Note at http://www.vmware.com/pdf/vsp_4_vmdirectpath_host.pdf.

VMDirectPath or SCSI Passthru - Making SCSI Card & Devices available to VM's on ESX 3.5.x onwards

Configuring tape drives and media changers on ESX 3.x


Making SCSI Card & Devices available to VM's on ESX 3.5.x onwards (PassThruSCSI)
So that VM (Guest OS) can access SCSI Card & Tape Drives / Medium Changers to fire Backup or Restore (directly from VM) -Currently OEM vendors are not supporting officially - But VMware supports

Details

This article provides instructions for configuring tape drives and media changers so that the virtual machines on ESX 3.x hosts can access the devices. 
Note: Fibre channel attached tape drives are not supported in ESX. For more information, see the SAN System Design and Deployment Guide.

Solution

Friday, March 26, 2010

Why should we call VMware will "Optimally utilize the Infrastrusture Resources" - Series1 - Keep your tab on this for my next Series


1) Memory Baloon Driver - Vmmemctl:
(My Understanding in other words - below)
Freeing up the non frequently used / less significant Memory Pages by inflating Vmmemctl Baloon Intentionally creating shortage of memory in specific VM, so that those non frequent Memory Pages Are pushed to Swap file and freed up Memory is under Common Pool (by Vmkernel control - can be shared to other VM's). Once Vmkernel is having enough Memory space and no application is Memory crunch, automatically Vmmemctl Baloon is Deflated, Specific VM has got back it's respective memory.. Very cool feature, 65% of specific VM memory can be freed up by Vmware by default by inflating this Vmmemctl Baloon Technique, However Admin can configure 0%-75% Vmmemctl baloon

Memory Balloon (vmmemctl) Driver
(Extract of VMware Online Library - below)

The
vmmemctl driver collaborates with the server to reclaim pages that are considered least valuable by the guest operating system. The driver uses a proprietary ballooning technique that provides predictable performance which closely matches the behavior of a native system under similar memory constraints. This technique effectively increases or decreases memory pressure on the guest operating system, causing the guest to invoke its own native memory management algorithms. When memory is tight, the guest operating system decides which particular pages to reclaim and, if necessary, swaps them to its own virtual disk.
Figure 9-3. Memory Ballooning

If necessary, you can limit the amount of memory vmmemctl reclaims by setting the sched.mem.maxmemctl parameter for a specific virtual machine. This option specifies the maximum amount of memory that can be reclaimed from a virtual machine in megabytes (MB). See Setting Advanced Virtual Machine Attributes.

2)Transparent Memory Page Sharing

Transparent page sharing is a cool feature of ESX Server that allows VMs to share memory pages that have identical content. If a VM needs to modify the shared data, then the VMkernel creates a new copy for the VM that it can modify. The Operating Systems are not aware that they are sharing memory with other VMs (hence, the name - Transparent page sharing implies)

My Understanding : VM kernel will keep monitoring all VM's Memory Pages and eliminates to occupy the space for redundant copies among various Memory Pages - Instead maintain one copy of common Memory Page ( rest of VM's will have pointer towards this)

CPU Hog - This Will Flood Your CPU - Very handy for your Vmware DRS Cluster Test (During DRS you may need to Tax your CPU with high load)


CPUHog is a 32-bit Windows CPU stressor. Use CPUHog to put
a vigorous load on the system processor. This can be used to check
for any possible CPU thermal Overheating conditions or to test how
other applications react when the CPU load is high.

Current Release: Version 1.0 - Nov 25, 2002

CPUHog Download

CPUHog Screen Shot

Top
Home | Software | Web Design | Links | Profile | Contact
Copyright © 1998-2010 MicroTask Computer Services. All rights reserved.

Thursday, March 25, 2010

VMware vSphere 4 Guided Consolidation

I have added VMware Mylearn Demo Link (Click this Link) - for Guided Consolidation Demo

 (Doesn't work If Pop Up Blocker is there)

Article Extract From : Whugh Griffin Word Press   (Below)

Guided Consolidation is a tool that will allow you to monitor a physical computer and determine it’s potential for adding to your virtual environment. I would highly recommend it for a small to mid sized business looking for some assistance with their P2V process. It has an easy to use interface with a more simplified approach than using the full VMware Capacity Planner utility.
It is free and can be installed from the vCenter installation CD. Once installed, it can be accessed from the vCenter Home Menu. In order to scan a physical computer, you will need to make sure the credentials provided during installation must have administrative permissions on any remote Windows systems selected for analysis. This user account supplied during installation is used to run the “VMware vCenter Collector Service”, a Windows service used to connect to the remote systems.
Once the tool begins to scan the system, it will gather data and display CPU information and utilization, memory information and utilization as well as the computer name. Sometimes it may take up to 1hr before this process begins. Be prepared to allow 24 to 48hrs for this process to complete as Guided Consolidation builds a confidence metric level. Once a high enough confidence level is reached, the status of the system changes to “Ready for consolidation”.
At this point, a consolidation plan is available by selecting the analyzed computer and clicking the “Plan Consolidation” button.
This plan will include a star rating which will identify how likely the physical computer is for virtualization and will even make a recommendation for the target host. The rating system ranges from 1 to 5 stars, with 5 stars indicating the system is a high candidate for the proposed host. From the Consolidation Wizard, you can change several things, the name of the VM, the host being assigned too or even remove a VM altogether from the list.
Multiple systems can be converted to VM’s using this wizard, it’s a very simple process and by the click of one button you are off to the races converting your physical systems to virtual machines.
***Keep in mind that before using Guided Consolidation that a datacenter exists and a host is added to the vCenter Server inventory. ***
I would highly recommend looking at this pdf: http://www.vmware.com/pdf/vsphere4/r40/vsp_40_admin_guide.pdf or picking up a copy of Mastering VMware vSphere 4 by Scott Lowe for more in-depth information on Guided Consolidation.
I hope this gives you a basic understanding of how Guided Consolidation can help you plan a smooth P2V process.

Wednesday, March 24, 2010

5 things you need to know about VMware vSphere Alarms

By David Davis from http://www.virtualizationadmin.com

Virtualization is an awesome thing but just like any piece of your IT infrastructure, you need to be alerted when something goes wrong
(and ideally, before something goes wrong). VMware vSphere has a powerful alerting or notification system built in called "Alarms" (call them whatever you want but if you want to use them in vSphere, you should start calling them "alarms"). Alarms can be configured to tell you when specific events, conditions, or states occur within the vSphere inventory.

Let's learn the 5 most important things you need to know about vSphere alarms.
  1. vSphere has 33 pre-configured and enabled alarms
  2. Alarms trickle down the vSphere inventory hierarchy
  3. vSphere has a Triggered Alarms and an Alarm Definitions View
  4. vSphere has 8 Alarm monitoring types
  5. An Alarm is defined by with a type, trigger, and action
In point #5, we learn that creating a new alarm is easy by following my simple 7 steps. Overall, it is crucial for vSphere Admins to understand how alarms work in order to properly monitor their virtual infrastructure and to be alerted of issues that need to be resolved. I encourage you to spend a few minutes working with vSphere alarms!
Step by Step Guide to learn above 5 Things --> Link here from www.virtualizationadmin.com

Fault Tolerance (FT) Implementation Checklist & Validation Tool (Site Survey Tool from VMware)

Here is the F.T Checklist (very handy) to get started with instant Implementations..


F.T is next level of H.A in vSphere
HA will power on the VM (causes reboot from beginning) on 2nd ESX host incase of 1st ESX (Native host of that VM) Fails..

But F.T will keep track of Memory changes on Primary ESX and keep replicating to to Secondary ESX Host (VM Memory - Standby) always. (LockStep Mechanism - Actually Vmware follows internally Record & Play Technology - inherited from VMware Player)  In case of 1st ESX Fails, same VM is instantly attached to 2nd ESX host (Completely Zero Downtime – Yeah, you heard it right, Zero downtime was not possible in HA)

I am excited to read between these lines & to implement this..

FT Check List --> http://ntpro.nl/blog/archives/1090-Fault-Tolerance-Checklist.html

In spite of having checklist verified, you my overlook a few..
Here is the trick of my sleeve, Just download and run the “Site Survey Tool” from VMware Shared utilities to validate F.T pre-requisites..

Provide your vCenter (IP / Hostname) --> as prompted by Site Survey Tool --> Select your Cluster in vCenter to run F.T Validations on your cluster

Tool will validate Proc Specs, Shared Storage, Thick Disk is there or not, Snapshot should not be in VM, more than single vCPU should not be there in VM and lot more..

Leave it tool to check it for you, post to which you may correct problems
(or else ensure to follow the F.T Checklist (link here) minimize issues)

Site Survey Tool Download link --> http://www.vmware.com/download/shared_utilities.html

New VMware Training Courses to be released in 2010

from NTPRO.NL - Eric Sloof
According to VMware’s education roadmap we can expect some new vSphere 4 training courses to be released in 2010. The courses marked red are currently in development and course details will be updated as soon as they become available. The release date is expected to be Q1/2010.

Virtualization Generalist
• VMware vSphere: Install, Configure, Manage
• VMware vSphere: Script & Automate
• VMware vSphere: Manage Availability
• VMware vSphere: Troubleshooting
• VMware vSphere: Design
Security Specialists

• VMware vSphere: Install, Configure, Manage
• VMware vSphere: Manage and Design for Security

Performance Specialists

• VMware vSphere: Install, Configure, Manage
• VMware vSphere: Manage and Design for Performance

Virtual Desktop Administrators

• VMware vSphere: Install, Configure, Manage
• VMware View 4: Install, Configure, Manage
• VMware View: Design

Availability Specialists
• VMware vSphere: Install, Configure, Manage
• VMware vSphere: Manage Availability
• VMware Site Recovery Manager 4: Install, Configure, Test
• Business Continuity Data Recovery: Design

Cisco Nexus 1000V Switch Seminar Series

The Cisco Nexus 1000V Switch delivers VN-Link services to virtual machines hosted on its server. It takes advantage of the VMware vSphere framework to offer tight integration between server and network environments, and to help ensure consistent, policy-based network capabilities to all servers in your data center.

Learn more about this software switch at the Nexus 1000V Switch Spring 2010 Seminar Series. The series has two tracks: Sales and Technical.

Topics include:

• Nexus 1000V Switch Business Impact and Return on Investment
• Basic Nexus 1000V Switch Features
• Accelerating Data Center Virtualization with Nexus 1000V Switch
• Advanced Nexus 1000V Switch Features
• Nexus 1000V Customer Panel
• Virtualize DMZ with Nexus 1000V Switch
• Analyst Panel Roundtable Discussion: Nexus 1000V Switch
• Approach Payment Card Industry (PCI) Compliance with Nexus 1000V Switch
• Ecosystem Partners & Products
• VN-Link and the Future of Virtual Networking
• Channel Partner Roundtable Discussion
• Interoperability with VMware Products
• Infrastructure as a Service Reference Architecture
• Cisco Nexus 1010 Virtual Services Appliance
• Advanced Networking in a Virtualized Environment

How to migrate the vCenter database to Microsoft SQL Server 2008

How to migrate the vCenter database to Microsoft SQL Server 2008

If you want to relocate your vCenter database from a local express SQL server to a central Microsoft SQL Server 2008, you can use the SQL Server Import and Export Wizard to copy and transform data between supported data sources and destinations.

The purpose of the SQL Server Import and Export Wizard is to copy data from a source to a destination. The wizard can also create a destination database and destination tables for you. However, if you have to copy multiple databases or tables, or other kinds of database objects, you should use the Copy Database Wizard instead.

I’ve created a little Jing movie which demos the migration from a local SQL express database to a central Microsoft SQL Server 2008.


Click here for Video --> "How to migrate the vCenter database to Microsoft SQL Server 2008"

This is how you should explain (VMware Hotel - Funny & Informative)

If Somebody asks you, So what if the Server goes down in VMware Infrastructure


If Vmotion Fails at 10% Progress - Beautiful Troubleshooting steps are here

How to troubleshoot VMware VMotion when it fails at 10%

http://kb.vmware.com/kb/1003734 This video helps you troubleshoot a situation where VMware VMotion fails at 10%. The video shows you how to perform some of the more common tasks associated with resolving the failure. For more information, you can visit the VMware knowledge base article. The article provides a few more troubleshooting steps for less common issues.

All Virtualization Forum 2010 session videos are released

All Virtualization Forum 2010 session videos are released

The session videos recorded by VMware are available at the Virtualization Forum Content Portal, by registering you will gain access to Keynote and Breakout Session records from the 2010 road show.

• Key-note : transformeer uw bedrijf met VMware
• Klantverhaal : de virtuele werkplek van PGGM
• The cloud - internal & external : bouw een interne cloud dat gereed is voor de externe cloud
• Desktop als een Managed Service
• Virtualization Management: transformeer het beheer van uw gevirtualiseerde datacenter
• Application Delivery : implementeer applicaties zonder conflict
• BC/DR : verbeter business continuity met virtualisatie
• Platinum sponsorsessies: EMC, HP, NetApp, Trend Micro
Click on below link to watch video, register you mail id, accept activation mail

http://www.vmware-forum.com/vforum/nijkerk/video/

Enabling CDP on a vSwitch? What will the Cisco admin see...

Enabling CDP on a vSwitch? What will the Cisco admin see...

It’s possible to configure the ESX host's virtual switches so the Cisco Discovery Protocol on a standard or distributed switch is issuing broadcasts containing some of your ESX host's information. After enabling the CDP on your ESX server, the Cisco administrator is able to listen for information broadcasted by your ESX host but what can he actually see? To find out I’ve installed the Tallsoft’s Cisco CDP Monitor on my vCenter server.

With Cisco CDP Monitor, you can display the information of the connecting Cisco devices, such as device names, device models, connecting port , administrative ip address, IOS version, VTP Domain Name, and so on. With this information, one could easily learn the total topology of the complete network and do troubleshooting. Once the Cisco Discovery Protocol information changes (such as the link or device failed, or the setup of Cisco device changed), Cisco CDP Monitor will detect it and will display the related info. It also shows information broadcasted by you ESX servers.

Virtual switches can be configured for four different CDP modes of operation:

Down – CDP information is neither sent nor received
Listen – CDP information is received from the physical switches
Advertise – CDP information is sent to the physical switches
Both – CDP information is sent to and received from the physical switches
For enabling CDP on standard switches you have to use command-line interface. CDP can be enabled on distributed switches using the vSphere Client. Here’s the info I was able to retrieve from an ESX host after running “esxcfg-vswitch -B both vSwitch0” in the service console.

Neigbour1:
device id: esx4-l.ntpro.local
ipaddress: 0.0.0.0
port: vmnic0
capabilities: Switch
ios_version: Releasebuild-208167
platform: VMware ESX
prefix:
vtp_domain:
native_vlan:
duplex: full

Not able to manage ESX from vSphere Client/vCenter --> How to associate Service Console to VMNIC0 (Phy NIC0) from CLI

ESX Server 3.x Service Console NIC Assignment (VMware KB 8018438)
--> During Installation of ESX did not assign Service Console to Phy NIC
--> or Can't Associate Network Card with Service Console
--> or Due to some problem (or messed up), Service Console is currently not assigned to Phy NiC

Details
When installing ESX Server 3.x, you are not given the option to select which network card should be associated with the service console. By default, it seems as though vmnic0 is selected.

Solution
Note: This article assumes that the correct network settings (IP Address, Subnet Mask, Gateway and DNS) were assigned during the initial installation.

To resolve this issue, use the esxcfg-vswitch command, as follows:
To the physical switch, attach only the network cable used for the service console.

List all of the network adapters from the ESX Server service console and locate the name of the vmnic# that has a link status of up.
# esxcfg-nics –l
If vmnic0 has a link status of up, stop now. Otherwise, remove vmnic0 from vSwitch0.
# esxcfg-vswitch -U vmnic0 vSwitch0

Associate the vmnic# that has a link status of up from step 2.
# esxcfg-vswitch -L vmnic# vSwitch0

Use the following commands to determine where the ESX Server service console portgroup is (if you are doing a repair after changing physical NICs or similar activity, for example):
# esxcfg-nics -l
Determines which NICs are link up esxcfg-vswif -l to ensure Service Console is the port group, and the settings are correct.

# esxcfg-vswitch -l
Shows which vSwitch the service console port group is in.

# esxcfg-vswitch -L
Links the vmnic and service console together.

Prior to changing the IP address of Service Console on ESX hosts

Take the following into consideration prior to changing the IP address of the Service Console:
  • Changing the primary Service Console's IP address may result in network connectivity loss.
  • Connect to ESX shell via a remote console or a KVM console. The PUTTY or SSH connection terminates during IP address change.
  • VMware HA and DRS, if enabled, must be disabled to eliminate failover.
  • Disconnect and remove the host from VirtualCenter.
  • Change the DNS database for the forward entries and the reverse entries if applicable.
  • For manual resolution in /etc/hosts, change the IP for each ESX host in the VMware HA cluster and, if needed, in any other host in your environment.
  • If there is more than one Service Console present, determine the primary one by checking /etc/sysconfig/network for default gateway device and IP address.

Changing the IP address on ESX 3.x and 4.0

To change the IP address on ESX 3.x and 4.0: 
  1. Log in as root to the ESX host console using a SSH or KVM connection.
  2. Run the following command to stop the network service:
    service network stop
     
  3. Run the esxcfg-vswif command to change the IP of the hosts:
    esxcfg-vswif -i NEW_IP_ADDRESS -n MASK_ADDRESS vswif0
     
  4. Edit the /etc/sysconfig/network file and change the gateway IP if needed.
  5. Run the following command to restart the network:
    service network start
     
  6. Add the host back to VirtualCenter using a FQDN (preferably) or by its IP.
  7. Reconnect host to VirtualCenter (if applicable).   

Changing the IP address on ESX 2.5

To change the IP address on ESX 2.5:
  1. Log in as root to the ESX host console using a SSH or KVM connection.
  2. Run the following command to stop the network service:
    service network stop 
  3. Change the IP and net mask in the correct file. Edit the /etc/sysconfig/network-scripts/ifcfg-eth0 file and change the IP and the net mask.
  4. Change the gateway configuration. Edit the /etc/sysconfig/network file and change the gateway IP if needed.
  5. Run the following commands to restart the interface and the network:
    • ifdown eth0
    • ifup eth0
    • service network start

Virtual Appliances from VMware MarketPlace

Virtual Appliances from VMware Market Place

Explore more than a 1000 cloud ready virtual applications in the VMware Virtual Appliance Marketplace. Browse and search through the largest library..

Don't surprise, you can make up & running almost every service in minutes using appliances
ex: DNS, DHCP, Monitor VM's, Backups, iSCSI Targets, AD

Click here to visit Instant VM Appliances Store

Vsphere 4 VCP course material

Hi VCPians,

Vsphere 4 VCP course material is here
Download Link is http://rkvonline.com/esx4books

Configuring and troubleshooting basic software iSCSI setup

Configuring and troubleshooting basic software iSCSI setup (Extract from Vmware KB 1008083)

Symptoms


You are experiencing these issues with iSCSI targets:
  • Targets are numbered out of sequence.
  • Targets do not appear in VMware Infrastructure (VI) Client or VirtualCenter.
  • Targets do not appear in vSphere Client or vCenter Server.

Purpose


This article provides basic software iSCSI setup, configuration and troubleshooting.

Resolution


Configuration

From vSphere Client/VMware Infrastructure (VI) Client or vCenter Server:

  1. Ensure you have a separate physical vswitch for iSCSI.

  2. Add a VMKernel and Service Console portgroup and give them appropriate IPs.

    Note: A service console may not be needed if working in ESX / ESXi 4.0.

  3. Log into the ESX host and ensure you can ping the iSCSI array. Run the following command:

    # ping 10.1.10.100

    PING 10.1.10.100 (10.1.10.100) 56(84) bytes of data.
    64 bytes from 10.1.10.100: icmp_seq=0 ttl=64 time=0.766 ms


    Note: You do not need to use ping when working with ESX / ESXi 4.0 hosts.

  4. Log into the ESX host and ensure you can vmkping the iSCSI array. Run the following command:

    # vmkping 10.1.10.100

    PING 10.1.10.100 (10.1.10.100): 56 data bytes
    64 bytes from 10.1.10.100: icmp_seq=0 ttl=64 time=0.940 ms


    If you are unable to ping or vmkping the array, you need to correct your network connectivity issue before iSCSI works.


  5. Log in to vCenter Server, click on the ESX host, and click Configuration.

  6. Click Storage Adapters and click on the iSCSI Software Adapter.

  7. In the Details pane, click Properties.

  8. On the General tab, click Configure, select Enabled, then click OK. You notice that the Status is now enabled, and the iSCSI name has a valid IQN.

  9. Configure the iSCSI array to use the IQN you have just created. Generally, you also need to assign storage to the ESX host from the array.

  10. Click the Dynamic Discovery tab and click Add.

  11. In the Add Send Targets Server area, add the iSCSI array IP to the iSCSI Server field and click OK.

  12. After the iSCSI Server is added, click Close. This may take a significant amount of time.

  13. Rescan the ESX host storage in the Storage Adapters section, after the rescan, click on the iSCSI initiator and you see information about the SAN array as well as one or more targets.

Troubleshooting

To troubleshoot your setup or re-number your targets:

  1. Ensure that the array, and possibly each Service Processor, has an entry in each of the following files:


    • /etc/vmkiscsi.conf

      Syntax: DiscoveryAddress=:

      For example, DiscoveryAddress=10.200.107.10:3260


    • /var/lib/iscsi/vmkbindings

      Syntax: 0 0

      For example, 0 0 iqn.1992-08.com.company:sn.84259608

      Note: This file is rebuilt on rescan and should be recreated if iSCSI target numbers are out sequence.

    • /var/lib/iscsi/vmkdiscovery

      Syntax: 0 0

      For example, 0 0 iqn.1992-08.com.company:sn.84259608

      Note: This should be recreated if iSCSI target numbers are out sequence.


  2. Restart the Software iSCSI initiator:


    1. Disable the software iSCSI interface

      # esxcfg-swiscsi -d


    2. Kill the iSCSI stack

      # esxcfg-swiscsi -k


    3. Re-enable the iSCSI interface and open the firewall

      # esxcfg-swiscsi -e


    4. Rescan the Software Initiator, wait about 30 seconds after re-enabling

      # esxcfg-swiscsi -s


  3. Rescan a second time.

  4. Reboot the ESX host to have the changes take effect.
Note: If the vswitch is using NIC teaming, as a troubleshooting step, try disabling the second NIC and see if iSCSI functions.

NIC teaming in ESX Server

NIC teaming in ESX Server

(Extracted from VMware KB Article: 1004088)

Purpose

This article discusses how to configure NIC teaming. A NIC team can share the load of traffic between physical and virtual networks among some or all of its members, as well as provide passive failover in the event of a hardware failure or a network outage.

Resolution


To utilize NIC teaming, two or more network adapters must be uplinked to a virtual switch. The main advantages of NIC teaming are:

  • Increased network capacity for the virtual switch hosting the team.

  • Passive failover in the event one of the adapters in the team goes down.
To configure NIC teaming using the Virtual Infrastructure Client:

  1. Highlight the host and click on the Configuration tab.

  2. Click the Networking link.

  3. Click Properties next to the virtual switch.

  4. On the Ports tab, highlight the name of the virtual switch and click Add.

  5. Select the appropriate network adapters and click Next.

  6. Ensure the selected adapters are under Active Adapters.

  7. Click Next.

  8. Click Finish.

  9. On the Ports tab, highlight the name of the virtual switch and click Edit.

  10. Click the NIC Teaming tab.

  11. The default load balancing policy is Route based on the originating virtual port ID. If the physical switch is using link aggregation, Route based on IP hash load balancing must be used. For more information, see ESX Server requirements for link aggregation (1001938).

Additional Information


Sample environment using four network adapters:
Virtual switch Portgroup # Uplinks
1 Service Console 1
2 Virtual Machine 2
3 Vmotion 1
The NIC team used for the virtual machine network provides extra capacity as well as failover and keeps the portgroup connected to the network if one of the network adapters fails. The VMotion uplink is ideally connected to its own subnet along with other ESX Server host's VMotion ports to separate its traffic from the virtual machine and Service Console traffic and maximize performance.
An additional network adapter can be uplinked to virtual switch 1 to provide for failover on the Service Console (management) interface, or to a new virtual switch 4 to provide for iSCSI or NFS storage (ideally on its own subnet).

DPM + DRS Step by Step guide

DPM + DRS Step by Step guide

This guide shows how DPM (Distributed Power Management) with the help of DRS

(Distributed Resource Scheduling) in VM Ware Manages the load of VM’s moved across the Physical hosts on demand & Saves the power..

Fully Automated mode in DRS (Do not use Conservative or Aggressive go mid of slider or little higher),

Else your VM’s will be hyper / less sensitive – to oscillate among Physical Machines, while change is there in Load.

Full Step by Step Guide - Link here


Nice Video (below) shows, How DPM will help us to save Power..

While Adding LUN to ESX Error --> Unable read partition information from this disk error

Troubleshooting the Add Storage Wizard error:
Unable read partition information from this disk error

Extracted from --> VMware Kbase (Link here)

Caution: Ensure that the selected disks or LUNs do not have production information as this is a destructive operation.
Symptoms

*Cannot use the Add Storage Wizard to format a disk with a new VMFS Datastore
*Creating a VMFS volume in VMware Infrastructure (VI) Client fails
*The Wizard reports that it is unable to read the pre-existing partition table from the disk
*You receive the following error:

Unable to read partition information from this disk

*The available LUN listing shows a blank in the free space column
*You see a message indicating that the ESX host cannot read the partition table
*The hostd logs contain entries similar to:

[2009-01-26 12:56:20.647 'Partitionsvc' 21990320 info] InvokePartedUtil /sbin/partedUtil
[2009-01-26 12:56:20.706 'Partitionsvc' 21990320 warning] Unable to get partition information for /vmfs/devices/disks/vml.0200030000600508b30093fcf0a05b5b8cc739002f4d
5341313531
[2009-01-26 12:56:20.706 'Partitionsvc' 21990320 warning] Status : 255
Output:
Error : Warning: /vmfs/devices/disks/vml.0200030000600508b30093fcf0a05b5b8cc
739002f4d5341313531 contains GPT signatures, indicating that it has a GPT table. However, it does not have a valid fake msdos partition table, as it should. Perhaps it was corrupted - possibly by a program that doesn't understand GPT partition tables. Or perhaps you deleted the GPT table, and are now using an msdos partition table. Is this a GPT partition table?
Error: The primary GPT table is corrupt, but the backup appears ok, so that will be used.
A bug has been detected in GNU parted. Please email a bug report to bug-parted@gnu.orgcontaining the version (1.6.3) and the following message:Assertion (last_usable <= disk->dev->length) at disk_gpt.c:480 in function _parse_header() failed.
Unable to read partition table for device /vmfs/devices/disks/vml.0200030000600508b30093fcf0a05b5b8cc
739002f4d5341313531

*Rescan and ESX boot operations experience long delays (40 - 120 seconds for each LUN with an EFI GPT partition)
*The Add Storage wizard times out while getting the list of available LUNs

Purpose
This article addresses the situation of an ESX host being unable to create a datastore because the volumes contain an existing non-msdos partition table.
Resolution
Cause
There are several different partitioning schemes that can be created. Each has a corresponding identifying disk label. Common labels include bsd, dvh, gpt, loop, mac, msdos, pc98 or sun. Of these, only the msdos label and partitioning scheme is used by ESX. Trying to create a volume using the Add Storage wizard fails unless the volume contains an msdos partition table or if there is no partition table at all. Any other kind of partition is left unchanged.
Note: Similar symptoms have been observed when a LUN which is greater than 2 terabytes is presented to an ESX host. For more information, see ESX does not support 2 terabyte LUN sizes (3371739).
Checking for non-msdos partitions

To check for non-msdos partitions:

1.Log into the ESX host console using an SSH client or the GUI. For more information, see Unable to connect to an ESX host using Secure Shell (SSH) (1003807).
2.Run the command:

fdisk -l

The output is similar to:

Disk /dev/sdb: 536 MB, 536870912 bytes
255 heads, 63 sectors/track, 65 cylinders
Units = cylinders of 16065 * 512 = 8225280 bytes

Device Boot Start End Blocks Id System
/dev/sdb1 1 66 524287+ ee EFI GPT
3.Make note of the Id and System values (highlighted in red). Depending on the value of these fields, ESX may not be able to perform operations to this disk. To allow ESX to make any modifications to this volume, the volume must have an msdos partition or no partition at all.

Changing the partition type in the ESX Service Console using the parted utility
The command line utility parted can be used in the Console operating system to change the label and partitioning scheme.
Warning: To support certain internal operations, ESX installations include a subset of standard Linux configuration commands (for example, network and storage configuration commands). Using these commands to perform configuration tasks can result in serious configuration conflicts and render some ESX functions unusable. Always work through vSphere Client when configuring ESX, unless otherwise instructed in vSphere documentation or by VMware Technical Support. The steps outlined here are potentially hazardous for your environment if they are not followed exactly. If you are not comfortable performing these steps, contact VMware Technical Support and work with them to resolve the issue.
To change the label and partitioning scheme:

1.Log into the ESX host console. For more information, see Tech Support Mode for Emergency Support (1003677).
2.Identify the LUN or disks which have pre-existing partition tables. For more information, see Identifying disks when working with VMware ESX (1014953).

Caution: Ensure that the selected disks or LUNs do not have production information as this is a destructive operation.
3.Run the command:

parted

Where is the disk or LUN identifier selected in step 2.

The following is an example output using the /dev/sdb identifier:

GNU Parted 1.8.1
Using /dev/sdb
Welcome to GNU Parted! Type 'help' to view a list of commands.
4.Within the (parted)prompt, run the command:

print

The output appears similar to:

Disk geometry for /dev/sdb: 0.000-512.000 megabytes
Disk label type: gpt
Number Start End Size File system Name Flags
1 17.4kB 134MB 134MB Microsoft reserved partition msftres
5.Review all of the information and ensure that this drive or LUN is not used for production information.
6.Within the (parted) prompt, run the following command to change the Disk label type to msdos:

mklabel msdos

Caution: The above operation deletes the pre-existing partitions.
7.Within the (parted) prompt, run the command:

print

The output appears similar to:

Disk geometry for /dev/sdb: 0.000-512.000 megabytes
Disk label type: msdos
Minor Start End Type Filesystem Flags
8.Within the (parted) prompt, run the following command to exit the parted utility:

quit
9.Retry the storage operation which was failing initially.

Clearing partitioning information in ESXi using the DD utility
Due to differences between ESX classic and ESXi, the parted utility is not available in ESXi. The following steps describe how to clear partitioning information for a LUN under ESXi.
Warning: The steps outlined here are potentially hazardous for your environment if they are not followed exactly. If you are not comfortable performing these steps, contact VMware Technical Support and work with them to resolve the issue.

1. Log into the ESX host console or via SSH. For more information, see Unable to connect to an ESX host using Secure Shell (SSH) (1003807).
2. Identify the LUN or disks which have pre-existing partition tables. For more information, see Identifying disks when working with VMware ESX (1014953).

Caution: Ensure that the selected Disks or LUNs do not have production information as this is a destructive operation.
3. Run the command:

fdisk -u

Where represents the select disk from step 2.

The output appears similar to:

Disk /dev/disks/vmhba2:0:3:0: 429.4 GB, 429491220480 bytes
255 heads, 63 sectors/track, 52216 cylinders, total 838850040 sectors
Units = sectors of 1 * 512 = 512 bytes

Device Boot Start End Blocks Id System
/dev/disks/vmhba2:0:3:1 128 838850039 419424956 ee EFI GPT
4. Make note of the bytes value highlighted in red.
5. Run the command:

dd if=/dev/zero of=/ bs=512 count=34

Where is the LUN or Disk selected in step 2.

Caution: This replaces the first 34 x 512 bytes of the disk with zeros. This is a destructive command.

Note: If you are using VMware ESXi or the you are specifying is located within the /vmfs/ directory, you may need to append the conv=notrunc parameter to the dd command. Not doing so may result in a Function not implemented error.
6. (GPT Partitions only) Calculate the value by using the following equation:

( / 512) - 34 =

For example:

(429491220480 / 512) - 34 = 838850006

Note: value is the value recorded in step 4.
7.(GPT Partitions only) Run the command:

dd if=/dev/zero of= bs=512 count=34 seek=

Where is the value calculated in step 6, and is the identified identified in step 2.

Caution: This replaces the last 34 x 512 bytes of the disk with zeros. This is a destructive command.
8. Retry the storage operation.

How to exempt the DELL OMSA port number only on ESX Firewall?

How to exempt the DELL OMSA port number only on ESX Firewall?
(Without Disabling entire Firewall)

Dell Openmanage Installation on ESX

Firstly the standard steps (to Install OMSA):

1. Download the tar file from the ftp site or the support site
2. Copy the file using winscp(this is what i use at least) to /tmp/openmanage on the server
3. Log into the box either via winscp /via putty or onto the console directly and type in:

cd /tmp/openmanage
tar -zxvf OM_X.X.0_ManNode_A01.tar.gz (OM_6.2.0_ManNode_A00.tar currently)

4. Once the files have unpacked type in:
cd linux/supportscripts/
./srvadmin-install.sh -x (-x is for express install and installs everything but if you only want to install specific features the commands you can also use are -d -w -r –s )

-d = Dell Agent
-w = web interface
-r = DRAC services
-s = storage management

5. Once the files have unpacked and installed type:
srvadmin-services.sh start
6. When the various component services have finished starting type in:
cd /tmp
rm -rf Openmanage
7. To allow the Openmanage agent to function the following firewall commands
need to be run,
these open the firewall ports required:
# esxcfg-firewall -o 1311,tcp,in,OpenManageRequest

Virtual Distributed Switch and vCenter Server failure

Virtual Distributed Switch and vCenter Server failure

What happens to ESX hosts Network Traffic(Incase of dVswitch Fails / Vcenter is down)
Dont miss out the last paragraph of this post
I’m currently working with my colleagues on an upgrade of our VI 3.5 infrastructure to vSphere Enterprise Plus. We have recently been mulling over some of the design elements we will have to consider and one of the ones that came up was virtual Distributed Switches (vDS). We like the look of it, it saves us having to configure multiple hosts with standard vSwitches and it also has some nice benefits such as enhanced network vMotion support, inbound and outbound traffic shaping and Private VLANs.
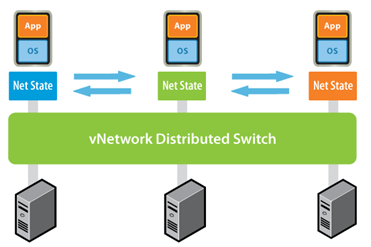
vDSOne of the questions that struck me was, what happens if your vCenter server fails? what happens to your networking configuration? Surely your vCenter server couldn’t be a single point of failure for your virtual networking, could it?
Well I did a bit of digging about, chatted to a few people on twitter and the answer is no it would not result in a loss of virtual networking. In vSphere vDS the switch is split into two distinct elements, the control plane and the data plane. Previously both elements were host based and configured as such through connection to the host, either directly using the VI client or through vCenter. In vSphere because the control plane and data plane have been separated, the control plane is now managed using vCenter only and the data plane remains host based. Hence when your vCenter server fails the data plane is still active as it’s host based where as the control plane is unavailable as it’s vCenter based.
Mike Laverick over at RTFM informed me that the central config for a vDS is stored on shared VMFS within a folder called the .dvsData folder. I’ve since learnt that this location is chosen automatically by vCenter and you can use the net-dvs command to determine that location. It will generally be on shared storage that all ESX hosts participating in the vDS have access to. As a back up to this .dvsData folder a local database copy is located in /etc/vmware/dvsData.db which I imagine only comes into play if your vCenter server goes down or if your ESX host loses connectivity to the shared VMFS with the .dvsData folder. You can read more about this over at RTFM

The vmClient 4.0 is released

The vmClient 4.0 is released

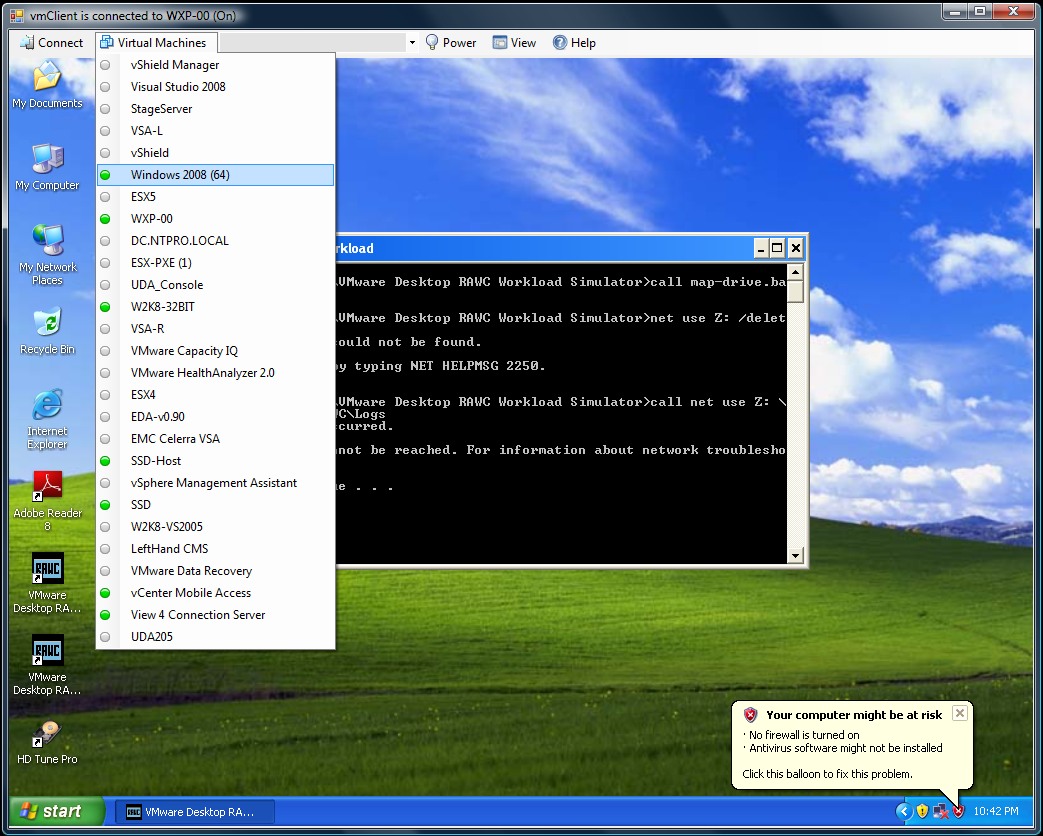
Eric Sloof just launched the vmClient 4.0 The vmClient is a lightweight tool which enables you to control the power of your virtual machines, it’s also capable of presenting the MKS console of your virtual machines. Before you can use the vmClient, you have to install the vSphere client on the same system. After starting the vmClient, you can logon to your vCenter server or individual ESX4 or ESX4i host. A list with available virtual machines will be presented after choosing the Virtual Machines menu item, you can also easily identify the power state of the virtual machines. Grey is powered off, green is powered on, yellow is suspended and red indicates that the virtual machine has an alarm. When you’re working in an RDP session there’s a menu item which can generate a Ctrl-Alt-Del in the guest OS instead of pressing Ctrl-Alt-Ins. The vmClient can run without borders in borderless mode. The menu bar has an option to search for virtual machines, just type in the first characters of your virtual machine name and the list will be filtered.

The number of virtual machines can be too high to fit in the “Virtual Machine” menu item so I’ve added an extra option to disable this menu and use the search menu instead. The option to customize the user interface of the vmClient can be done by changing a few registry settings. You’re able to show or hide menu items using this hive.

HKEY_CURRENT_USER\Software\VB and VBA Program Settings\NTPRO.NL\vmClient

You can also pre-select a default virtual machine in this hive. There are two recorded demo sessions available, one which show a walkthrough and a second which shows how to convert the vmClient into a VDI client. The trail version is limited to a maximum number of 50 virtual machines and shows a splash screen with my picture in it. The registered version can be bought online and has no virtual machine limit, you can also get rid of the splash screen. :-) The Buy Now link is available in the help menu. If you have any ideas or suggestions on improving the vmClient or you’ve found a bug, you know where to reach me. Have fun with it.

How to convert the vmClient into a VDI client
A general walkthrough
The vmClient 4.0 can be downloaded from this location: http://vmclient.nl/

VMware Labs is online and it Rocks

VMware Labs is online and it Rocks

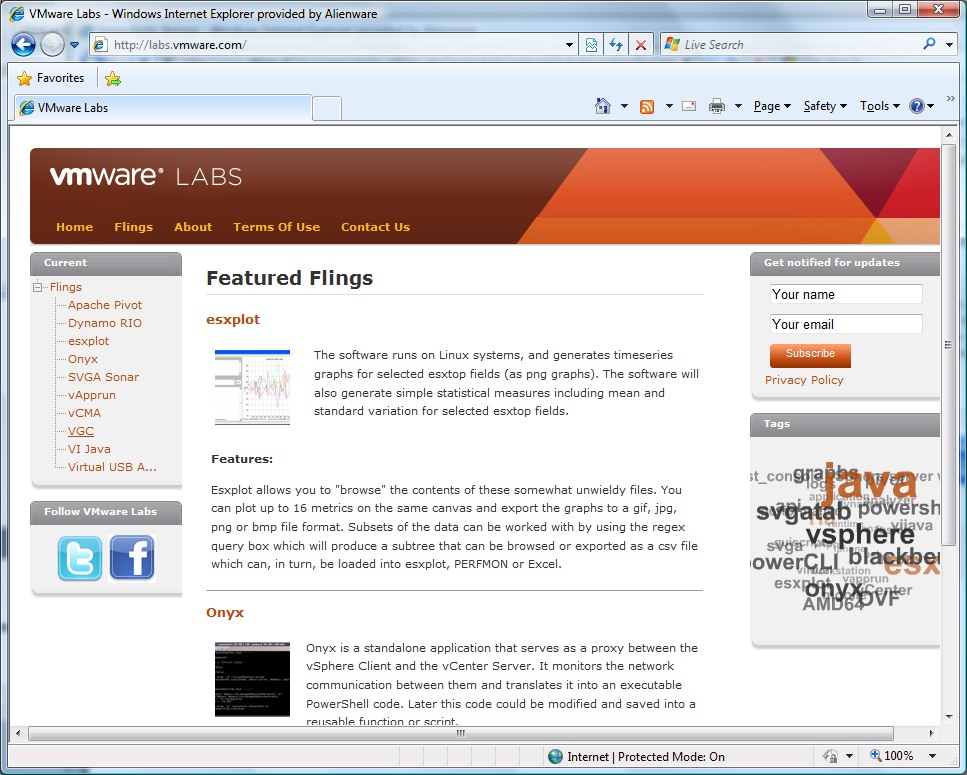
http://labs.vmware.com/ VMware Labs is the place where VMware engineers share their cool tools. There is a wide range of tools here for you, including one for automating tasks, getting ESX performance graphs, a rich Internet application framework and much more. You really should check-out the fling section, this is too good to be true.

Fling is defined as "a brief casual relationship" as referenced on this site. The "flings" are skunkworks and ideas by VMware engineers that are not yet part of product offering. Feel free to try them and give your feedback.

Apache Pivot
Apache Pivot is a platform for building rich internet applications in Java. It combines the enhanced productivity and usability features of a modern RIA toolkit with the robustness of the industry-standard Java platform.
Dynamo RIO
DynamoRIO is a runtime code manipulation system that supports code transformations on any part of a program, while it executes. DynamoRIO gives complete control over the runtime code stream and does not limit transformations to trampoline insertion.

esxplot
The software runs on Linux systems, and generates timeseries graphs for selected esxtop fields (as png graphs). The software will also generate simple statistical measures including mean and standard variation for selected esxtop fields.

Onyx
Onyx is a standalone application that serves as a proxy between the vSphere Client and the vCenter Server. It monitors the network communication between them and translates it into an executable PowerShell code. Later this code could be modified and saved into a reusable function or script.

SVGA Sonar
SVGA Sonar is a demo application for SVGADevTap. SVGADevTap is a user-level library that communicates with the VMware SVGA guest driver to provide low-latency notifications of changes to the screen.

vApprun
The vapprun command-line tool brings the full vApp model to Workstation and Fusion. It builds vApps that contain multiple VMs or nested vApps. Configure start/stop ordering of child elements of a vApp. Power-on/power-off/shutdown of vApps.Supports OVF Properties and the OVF Environment.
vCMA
Ever wish you could restart a virtual machine or migrate it to another host from the convenience of your mobile phone? With VMware vCenter Mobile Access, you can monitor and manage VMware Infrastructure from your mobile phone with an interface that is optimized for such devices.

VGC
VMware Guest Console (VGC) is an application to manage the Guest Operating Systems installed on a VM. VGC includes a Unified Task Manager, Guest file system explorer, Snapshot Manager and a VM Manager. VGC is supported with vmware server and desktop products like vSphere, Server 2.0 and Workstation and can connect to multiple hosts simultaneously.

VI Java
The VMware vSphere Java API provides a full set of libraries to manage and control VMware virtual machines and servers. Ver 2.0 includes a high performance Web Service engine much faster/smaller than Apach AXIS.

Virtual USB Analyzer
We developed vusb-analyzer at VMware as an efficient way to debug our own USB virtualization stack. We wanted a tool that made it easy to see problems at a glance, and we wanted a way to solve both correctness and performance bugs. As a result, we ended up with what we think is a fairly unique tool. We’re excited to have the opportunity now to release this tool as open source software, under the MIT license.
http://labs.vmware.com/