Thursday, October 28, 2010
Wednesday, October 27, 2010
Train Signal VMware vSphere Video Training
Train Signal VMware vSphere Video Training
| NEW! As a follow up to David Davis's best selling video series on VMware ESX Server, David has released an entirely new video training course covering VMware vSphere. The course is available from www.TrainSignal.com! This video series is over 17 hours and provides hands-on demonstration of VMware vSphere, from installation to advanced features. In the video series, David covers awesome new vSphere features like Fault Tolerance (FT), Host Profiles, Hot Add of CPU/RAM, and Data Recovery. To watch a free demo of the course, visit the Train Signal.com VMware vSphere video training website! You'll be glad you did. |  |
Monday, August 2, 2010
What is MultiCore Virtual CPU?
VMware multicore virtual CPU support lets you control the number of cores per virtual CPU in a virtual machine. This capability lets operating systems with socket restrictions use more of the host CPU's cores, which increases overall performance.
You can configure how the virtual CPUs are assigned in terms of sockets and cores. For example, you can configure a virtual machine with four virtual CPUs in the following ways:
* Four sockets with one core per socket
* Two sockets with two cores per socket
* One socket with four cores per socket
Using multicore virtual CPUs can be useful when you run operating systems or applications that can take
advantage of only a limited number of CPU sockets. Previously, each virtual CPU was, by default, assigned
to a single-core socket, so that the virtual machine would have as many sockets as virtual CPUs.
When you configure multicore virtual CPUs for a virtual machine, CPU hot Add/remove is disabled.
For more information about multicore CPUs, see the vSphere Resource Management Guide. You can also search the VMware KNOVA database for articles about multicore CPUs.
CAUTION You must assign a value to configuration parameter keywords. If you don't assign a value, the
keyword can return a value of 0, false, or disable, which can result in a virtual machine that cannot power on.
Prerequisites
IMPORTANT To use the VMware multicore virtual CPU feature, you must be in compliance with the
requirements of the operating system EULA.
* Verify that the virtual machine is powered off.
* Verify that you have virtual machine hardware version 7 or later.
* Verify that the total number of virtual CPUs for the virtual machine divided by the number of cores per
socket is a positive integer.
VMware Log Locations & Descriptions
The vCenter Server logs can be viewed from:
- The vSphere Client connected to vCenter Server (click Home > Administration > System Logs)
- The vSphere Client connected to VirtualCenter Server (click Administration > System Logs).
The logs are located in %ALLUSERSPROFILE%\Application Data\VMware\VMware VirtualCenter\Logs, which translates to C:\Documents and Settings\All Users\Application Data\VMware\VirtualCenter\logs in Windows 2003 and C:\ProgramData\VMware\VMware VirtualCenter\Logs in Windows 2008.
The vCenter Server logs appear as vpxd-xx.log.
The vpxd-profiler-xx.log is used for the VPX Operational Dashboard (VOD),which can be accessed via https:///vod/index.html .
• Vmkernel – /var/log/vmkernel – records activities related to the virtual machines and ESX server.
• Vmkernel Warnings – /var/log/vmkwarning – This log is a copy of everything marked as a warning or higher severity from vmkernel log. It is much easier to look through this for warnings and errors, instead of filtering through the full information in the vmkernel logs.
• Vmkernel Summary – /var/log/vmksummary – Used to determine uptime and availability statistics for ESX Server; human-readable summary found in /var/log/vmksummary.txt
• ESX Server host agent log – /var/log/vmware/hostd.log – Contains information on the agent that manages and configures the ESX Server host and its virtual machines (Search the file date/time stamps to find the log file it is currently outputting to).
• Service Console – /var/log/messages – This log is the log from the Linux kernel (service console), which is generally only potentially useful in the case of a host hang, crash, authentication issue, or 3rd party app acting up. This log has NOTHING to do with virtual machines. The SERVICE CONSOLE (red hat kernel) has NO awareness of the VMs (worlds) running on the VMKERNEL.
Location of Logs & Brief note on that
• Web Access – /var/log/vmware/webAccess – Records information on Web-based access to ESX Server.
• Authentication log – /var/log/secure – Contains records of connections that require authentication, such as VMware daemons and actions initiated by the xinetd daemon.
• VirtualCenter agent – /var/log/vmware/vpx – Contains information on the agent that communicates with VirtualCenter.
• Virtual Machines – The same directory as the affected virtual machine’s configuration files; named vmware.log – Contain information when a virtual machine crashes or ends abnormally.
/var/log/vmkernel Vmkernel Records activities related to the virtual machines and ESX host
/var/log/vmkwarning Vmkernel Warnings A copy of everything marked as a warning or higher severity from vmkernel log. Easier to look through than vmkernel log
/var/log/vmksummary Vmkernel Summary Used for avaialability and uptime statistics. Human-readable summary in vmksummary.txt
/var/log/vmware/hostd.log Host Agent Log Contains information on the agent that manages and configures the ESX host and its virtual machines
/var/log/vmware/vpx VirtualCenter Agent Contains information on the agent that communicates with VirtualCenter
/var/log/messages Service Console Log from the Linux kernel. Useful for underlying Linux issues. The kernel has no awareness of VMs running on the VMkernel
/var/log/vmware/esxcfg-boot.log ESX Boot Log ESX Boot log, logs all ESX boot events
/var/log/vmware/webAccess Web Access Records information on Web-based access to ESX Server
/var/log/secure Authentication Log Contains records of connections that require authentication, such as VMware daemons and actions initiated by the xinetd daemon
/var/log/vmware/esxcfg-firewall.log ESX Firewall Log Contains all firewall rule events
/var/log/vmware/aam High Availability Log Contains information related to the High Availability (HA) service
/var/log/vmware/esxupdate.log ESX Update Log Logs all updates completed using the esxupdate tool
There’s a new Knowledgebase article on this here: VMware KB: http://kb.vmware.com/kb/1021806 Location of log files for VMware products
Monday, June 14, 2010
Troubleshooting Virtual Machine snapshot problems
A nice guide on Troubleshooting VM snapshot problems --> http://is.gd/ckwDc
This troubleshooting guide explains basic concepts about Virtual Machine snapshots and different troubleshooting paths depending on the problem. This guide was designed for ESX3.5 and extra considerations have to be taken if working with ESX3.5i or ESX4(i). The formulas and most of the procedures described in this document were created by Ruben as part of a continuous troubleshooting improvement process.
Ruben is also creator of SnapVMX utility.
While troubleshooting Virtual Machine (VM) snapshot problems sometimes it is important to retrieve a lot of information in order to take the most appropriate decision in accordance with the situation. That collection and arrangement of information may take a long time especially if the VM has many snapshots.
SnapVMX was created to speed up the troubleshooting process bringing you instantaneously all the information that you need to evaluate the situation and take the correct decision, reducing the downtime to the bare minimum needed to solve the problem,
Source : Eric Blog
Also Try below VMware KB TV - Consolidating snapshots (VMware KB 1007849) - video below
Using MOB- (Managed Object Browser) --> Ops Panel for ESX
I was recently reading Eric Sloof article,
Where you can go and edit (index.html - which opens as ESX server home page) customize by using MOB (Via Java Scripting).. here is the cool video by Eric.
The Operations Panel is a script tool, which runs on the client browser and extends the default ESX server web page with a short list of all available virtual machines. It gives the user the ability to perform simple power operations (start, stop, suspend, resume). Easily accessible user interface for some of the most common operations on an ESX host, available directly from the ESX home page.
Ops Panel for ESX from Eric Sloof NTPRO.NL on Vimeo.
Top 10 Free vSphere ESX Tools and Utilities
Top 10 Free vSphere ESX Tools and Utilities
http://www.kendrickcoleman.com/index.php?/Tech-Blog/top-10-free-vsphere-esx-tools-and-utilities.html
http://www.kendrickcoleman.com/index.php?/Tech-Blog/top-10-free-vsphere-esx-tools-and-utilities.html
64GB Addressable Memory Limit on ESX 3.x Host
Prior to ESX 3.5 Update 3, the ability to address more than 64GB of memory on ESX Server 3.5 is suppressed by default. In a standard installation, a 36bit MTRR mask is forced, even though the machine may support 40bit mask values. This means that the ESX Server may see any memory above 64GB as memory that is in use. For example, if an ESX server has 256GB of RAM, the Memory Usage counter displays 192GB in use and only 64GB free. If you attempt to create a virtual machine using memory exceeding the available 64GB of memory, you see an Insufficient Memory error. This condition is documented in the following location: http://www.vmware.com/support/vi3/doc/vi3_esx35u3_rel_notes.html
For more details & Resolution refer Jason Boche Article below..
http://www.boche.net/blog/index.php/2010/05/24/esx-3-x-host-64gb-addressable-memory-limit/
For more details & Resolution refer Jason Boche Article below..
http://www.boche.net/blog/index.php/2010/05/24/esx-3-x-host-64gb-addressable-memory-limit/
Friday, June 11, 2010
Monday, May 24, 2010
How to power off an unresponsive VMware ESX virtual machine
Sometimes Guest OS will go stale / hang due to various reasons..
follow the below VMware KBTV Article to handle the situation..
follow the below VMware KBTV Article to handle the situation..
Friday, May 21, 2010
VM World 2009 - Glimpse of EMC Ionix Data Center Insight (DCI)
My take away on IONIX DCI is - Ionix DCI will understand your IT infrastructure better than you and show case and index for blink away search any equipment & it's span across your Data Center.. I would recommend you to watch the below video (Full Screen) to get to know more..
EMC Unveils Ionix Data Center Insight Laying Foundation for Unified IT Configuration Visibility Across the Data Center.
nix Data Center Insight is a key piece of EMC's newly announced Ionix IT management suite — powerful solutions for automating IT management across a unified infrastructure of storage, server, network and virtualization resources. With Ionix, customers can confidently move from physical to virtual to cloud computing — maximizing the value of their new enterprise IT architecture.
With Ionix Data Center Insight, customers can quickly and easily:
Automatically populate both EMC and third-party CMDBs with best-practices configuration items (CIs) and allows customization to define customer-specific CIs
Build a single, reconciled view of the truth about the IT environment
Visualize application and service dependencies across the data center — including applications, servers, networks, storage — both physical and virtual
Leverage the solution as a critical component of a federated and modular CMS to achieve a single, accurate and current view of the IT environment, so those responsible for configuration management can understand — across multiple domains — the resources underpinning business services
Architected to support heterogeneous, third party data sources, Ionix Data Center Insight initially supports discovery from a wide variety of EMC Ionix data sources. Ionix Data Center Insight automates the integration of these discovery sources and populates best-practices-based configuration information into the leading CMDBs such as EMC Ionix Service Manager CMDB. Additionally, Data Center Insight provides a web services visualization layer that enables cross-domain dependency mapping with search functions — spanning applications, servers, networks and storage — physical and virtual
Saturday, May 8, 2010
How to connect to an ESX host using a SSH Client
How to connect to an ESX host using a SSH Client
This article details steps for connecting to an ESX host using an SSH Client. This video uses the PuTTY SSH Client, but a number of different clients work similarly. The steps in the video are the same for different versions of ESX, but for the video, we used ESX 4.
For more information and context, continue reading Connecting to an ESX host using a SSH client
For more information and context, continue reading Connecting to an ESX host using a SSH client
How to connect to an ESX host using a SSH Client
Friday, April 23, 2010
Hitachi Data Systems has released a free eBook on Storage Virtualization..

Hitachi Data Systems has released a free eBook on Storage Virtualization..
Click on below link to download eBook..
http://www.hds.com/go/dummies/index.html?WT.ac=us_hp_sp1r1
VMware has released the vSphere 4.0 Hardening Guide
VMware would like to announce the availability of the final release of the vSphere 4.0 Security Hardening Guide. This version incorporates the extensive feedback from the VMware community on the previous draft release, which was published in January. We would like to thank all the people who took the time to go through the draft release and provide their comments.
vSphere Hardening Guide provides guidance on how to securely deploy vSphere 4.0 in a production environment. The focus is on initial configuration of the virtualization infrastructure layer, which covers the following:
•The virtualization hosts (both ESX and ESXi)
•Configuration of the virtual machine container (NOT hardening of the guest OS or any applications running within)
•Configuration of the virtual networking infrastructure, including the management and storage networks as well as the virtual switch (but NOT security of the virtual machine’s network)
•vCenter Server, its database, and client components
•VMware Update Manager (included because the regular update and patching of the ESX/ESXi hosts and the virtual machine containers is essential to maintaining the security of the environment)
http://communities.vmware.com/docs/DOC-12306
Thursday, April 15, 2010
VMware KB video showing patching of ESX Host. vSphere 4 Update Manager in action.
If you never used VMware vSphere 4 update manager before, this video shows you how to get started and how to successfully apply a necessary security patches to your ESX host.
The GUI interface seems to be difficult to understand, but hopefully with this video you’ll be able to find your way around. A terms like schedule patches definitions download, baselines, remediation, ESX hosts, scan of ESX host, maintenance mode will be shown. It’s an easy step-by-step video you can follow if you’re new to VMware and managing Virtual Infrastructure with VMware vSphere 4.
Popout
This video details installing patches or updates to your VMware ESX host using VMware vCenter Update Manager. This video was created using ESX 4.0 and Update Manager 4.0. The same basic steps apply to other versions of ESX. This video also shows you how to determine how often your host checks for patches or updates, where to schedule the task, and how to run the task manually.Source: VMware KB
How to maintain a the same MAC address all the time within your vSphere 4 installation.
If you want to guarantee that the same MAC address is assigned to a given virtual machine every time, even if the virtual machine is moved, or if you want to guarantee a unique MAC address for each virtual machine within a networked environment you have 2 choices. You can do it on the VM configuration level or you can do it on the guest level.
On the VM level you can do it via GUI or by editing your VMX file (just make sure that you unregister the VM from vCenter first, otherwise vCenter will overwrite the value) you go to Menu VM > Edit Settings > Network Adapter and you set the radio button on Manual. Then you can assign a static MAC address there between the authorised range by VMware. The MAC address range is:
00:50:56:00:00:00-00:50:56:3F:FF:FF

If in some rare cases you need to keep the same MAC as for exaple on your Physical server (for some software license files tightened to a MAC address for exemple), and the MAC adress is outside of the range, you have the possibility to do it inside of your Windows (linux) VM.
On the Windows VM you do it in the properties of your NIC:
Start the VM and in the Windows system go to Control panel > network connections > Properties

Click the Configure button and go to Advanced Tab where on selecting Locally administered value you are able to enter your own value.

And for linux VM you can try this:
ifconfig eth0 down
ifconfig eth0 hw ether xx:xx:xx:xx:xx:xx
ifconfig eth0 up
There is reference webpage I found about MAC addresses ranges on VMware’s Website here. The page is is for VMware ESX Server 2.1, but it’s still valuable… There might be other resources on that, feel free to post a comment…
Source : www.vladan.fr Feeds
VMware Update manager does not scan hosts??? Disable Internet Explorer Enhanced Security Configuration on Win2k8
VMware update manager hated me and wouldn’t scan any of my hosts, one of the many fixes I was trying was making sure that my VMware Update Manager server could reach the patch stores to download updates and do patch checks and so decided to make sure of this I wanted to remove the painfully irritating Internet Explorer Enhanced Security Configuration. Now before I get loads of comments saying this is dangerous etc etc and that it’s a security risk,I know it is but for testing purposes I wanted to do it so I did. Now the point of this blog is that to disable it isn’t as easy as it used to be in 2003 as you used to just:
- Go to Control Panel
- Add/Remove Programs,
- Add/Remove Windows Components on the left hand side

- Untick it from the drop down list

But for Windows Server 2008 I couldn’t find it anywhere in the features drop down lists which has replaced the Windows Components in Server 2008. Fortunately while on another Server 2008 server I noticed the place to disable it. In the Server Manager root page under the Security Information section is Configure IE ESC

All you need to do is click on this link and disable it for either Administrators and/or for Users. I only needed for Administrators so this is what I selected for the testing.

Source : EMC Feeds
Monday, April 12, 2010
Rename VMDK files – else you may have to experience Backup Problems
What if you end up with the same vmdk file name on different datastores?
A simple case scenario that can happens:
A single VM has several hard disk attached to it. The hard disk VMDK files are located on different datastores. When creating a new hard disk which location is on different datastore to a VM, the name given to this VMDK is the same as the first VMDK.
For exemple, you VM has a disk called TS01.vmdk which is located on DATASTORE1, and you create a second disk located on DATASTORE2. This disk takes the same name as the first one…. This is not a problem for VMware, but it is for third party backp products like Symantec Backup Exec 2010. In fact what happens to the backup job wanting to backup a VM like this? The VMDK is marked as a corrupted and the job fails, so it's impossible to restore either.
What's the solution? VMware KB had give me an simple answer what to do in the case like this. You'll have to use vmkfstools via command line to do the job. Don't worry, it's not difficult.
How to:
01. First, make sure that the VM has NO Snapshots. Then power down your VM go to menu Edit Settings.
On the next screen you just go to the hard disk you want to rename. Select the hard disk and click the remove button. The screen change and you have the possibility to check a radio button to delete the disk from datastore. Don't check this radio button. Otherwise your disk gets deleted..
02. Validate your choice on clicking OK.
03. Then you must connect to the console of the ESX server to which the datastore2 is attached to. Use putty or go directly to the server room.
04. Via putty navigate to the folder where the hard disk is located and execute following command:
vmkfstools -E <old_name> <new_name>
So in our case the command looks like this (I'm renaming from ts01.vmdk to ts01_2.vmdk):
vmkfstools -E ts01.vmdk ts01_2.vmdk
05. Then go to your VI client and add the renamed disk back to the virtual machine. In the Inventory browser by right clicking the datastore and where the VM is stored and select "Browse Datastore", select the folder of the VM than right click the vmx file and select "Add to Inventory".
This works fine for ESX 4, but to be able to use it with ESXi 4 you have several choices:
01. You can use the unsupported (Tech Support Mode) to get to the console of ESXi 4 since the CLI tools won't work for writing data in the free version of ESXi 4.
02. If your ESXi 4 is licensed with paid VMware License you can use PowerCLI or VMA to do the job.
Source : www.vladan.fr
Thursday, April 8, 2010
What is FAST? (Fully Automated Storage Tiering) at vBlock (by VMware, EMC, Cisco)
What is FAST? (Fully Automated Storage Tiering) at vBlock
Now available for 3 Flavors (Celera, CX4, Symmetrix)
FAST approach is the Brand new at EMC,
which will automatically move the the LUNs as below..
High I/O LUN’s to Flash Drives (SSD Hdd’s)
Modest I/O LUN’s to F.C Drives
Least I/O LUN’s to SATA Drives
Here are some features, highlights of FAST and how it operates.
• FAST will perform data movement based on IOPS, average I/O size and write percentage.
This is currently true for the Symmetrix V-Max, Clariion CX4 and Celerra NS.
• Three elements that define FAST: Storage Type, FAST policies and Storage Groups.
• FAST is based on user defined -- configuration policies.
• The configuration of FAST is typically done through FAST wizards FAST LUN Migrator for Clariion CX4,
(Symmetrix Management Console) on Symmetrix V-Max and Rainfinity File Management Appliance or VE for Celerra NS.

NOTE: Out of the box thinking by EMC, imagine the flexibility one would have
with a large infrastructure and FAST moving data based on policy.
It’s all about the big picture.

FAST – EMC Hands on Demo
Source : www.storagenerve.com (Full Article Link below)
http://storagenerve.com/tag/vblock/
Now available for 3 Flavors (Celera, CX4, Symmetrix)
FAST approach is the Brand new at EMC,
which will automatically move the the LUNs as below..
High I/O LUN’s to Flash Drives (SSD Hdd’s)
Modest I/O LUN’s to F.C Drives
Least I/O LUN’s to SATA Drives
Here are some features, highlights of FAST and how it operates.
• FAST will perform data movement based on IOPS, average I/O size and write percentage.
This is currently true for the Symmetrix V-Max, Clariion CX4 and Celerra NS.
• Three elements that define FAST: Storage Type, FAST policies and Storage Groups.
• FAST is based on user defined -- configuration policies.
• The configuration of FAST is typically done through FAST wizards FAST LUN Migrator for Clariion CX4,
(Symmetrix Management Console) on Symmetrix V-Max and Rainfinity File Management Appliance or VE for Celerra NS.
NOTE: Out of the box thinking by EMC, imagine the flexibility one would have
with a large infrastructure and FAST moving data based on policy.
It’s all about the big picture.
FAST – EMC Hands on Demo
Source : www.storagenerve.com (Full Article Link below)
http://storagenerve.com/tag/vblock/
Wednesday, April 7, 2010
How to Decode MCE from PSOD (ESX dump) to identify the H/w Errors
Next time you see a PSOD (Pink Screen on Death) for ESX Server..
Look for any MCE (Machine Check Error) in the PSOD screen to isolate H/w issues.
MCE errors are always indication of some H/w failure..
Decoding the MCE:
For AMD CPUs you can use MCAT utility to decode the MCE for you..
www.amd.com/us-en/assets/content_type/utilities/mcatsetup.exe
For Intel CPUs you need to convert the MCE from
Hexadecimal to Binary and decode the error manually..
Watch the Video for how to decode the MCE for AMD Processors
Source : VMware KB - 1005184
Friday, April 2, 2010
VMware vCenter Mobile Access (vCMA) - Allow to Manage Vsphere Infrastructure from Mobie.. Yes, You heard it Right!
VMware vCenter Mobile Access (vCMA) - vCMA allows you to monitor and manage VMware Infrastructure from your mobile phone with an interface that is optimized for such devices. Specifically, it allows you to:
Installation Procedure & Packaging
The vCenter Mobile Access server is packaged as a virtual appliance. The username/password on the appliance is root/vmware but console access should not be required. The root password should be changed after install.
Download the vCMA OVF distribution zip file from this link (the file is approximately 350 megabytes). The zip file contains the appliance OVF file and other system files.
Follow these steps to install the Mobile Access appliance:
1. Extract the zip file to a temporary directory, for example c:\temp. The files contained in the zip file include :
* vCenterMobileAccess-1.x.y.z.ovf
* system.vmdk
2. Launch the VI Client and log into your ESX box or vCenter instance.
3. In the inventory view, select the menu File-> Virtual Appliance -> Import…
4. Select the option “Import from file:” and browse to the OVF file, for example: c:\temp\vCenterMobileAccess-ovf\vCenterMobileAccess-1.0.0.10.ovf and follow the wizard next steps.
5. In the “End User License Agreement” page, read the license agreement completely and click on the “Accept all license agreements” and continue the steps.
6. In the “Name and Location” page, provide the name for your Virtual Machine.
7. Once the wizard completes, a virtual machine will be created. Select the virtual machine and power it on.
Open your local browser (http://IP Address of vCMA:5480)
On your mobile http:///vim
Once connected, you will see the login screen where you can provide the vCenter or ESX IP address or name as well as username and password.
- Search for virtual machines in your data center
- Migrate virtual machines from one host to another using vMotion
- Execute recovery plans using VMware Site Recovery Manager
- Access Scheduled Tasks, Alarms and Events
Installation Procedure & Packaging
The vCenter Mobile Access server is packaged as a virtual appliance. The username/password on the appliance is root/vmware but console access should not be required. The root password should be changed after install.
Download the vCMA OVF distribution zip file from this link (the file is approximately 350 megabytes). The zip file contains the appliance OVF file and other system files.
Follow these steps to install the Mobile Access appliance:
1. Extract the zip file to a temporary directory, for example c:\temp. The files contained in the zip file include :
* vCenterMobileAccess-1.x.y.z.ovf
* system.vmdk
2. Launch the VI Client and log into your ESX box or vCenter instance.
3. In the inventory view, select the menu File-> Virtual Appliance -> Import…
4. Select the option “Import from file:” and browse to the OVF file, for example: c:\temp\vCenterMobileAccess-ovf\vCenterMobileAccess-1.0.0.10.ovf and follow the wizard next steps.
5. In the “End User License Agreement” page, read the license agreement completely and click on the “Accept all license agreements” and continue the steps.
6. In the “Name and Location” page, provide the name for your Virtual Machine.
7. Once the wizard completes, a virtual machine will be created. Select the virtual machine and power it on.
Open your local browser (http://IP Address of vCMA:5480)
On your mobile http:///vim
Once connected, you will see the login screen where you can provide the vCenter or ESX IP address or name as well as username and password.
Thursday, April 1, 2010
Feature Compare vSwitch 3.5, vSwitch 4.0, dVswitch 4.0, Cisco Nexus 1000
The following Table is a list of the key features of VMware vNetwork Distributed Switch. For a comprehensive list of VMware vSphere features download the key features summary.
Simplify and Enhance Virtual Machine Networking
- Simplified provisioning and administration of virtual networking across many hosts and clusters through a centralized interface.
- Simplified end-to-end physical and virtual network management through third-party virtual switch extensions for the Cisco Nexus 1000V virtual switch.
- Enhanced provisioning and traffic management capabilities through private VLAN support and bi-directional virtual machine rate-limiting.
- Enhanced security and monitoring for virtual machines migrated via VMware VMotion through maintenance and migration of port runtime state.
Load-balancing Methods (I prefer to call Teaming Methods) --> 1) Originating Port ID Based 2) MAC Hash Based 3) IP Hash Based - Which is best, in real & what supports Actual Load Balance????
Now that we understand the basics, we will move on to the topic at hand, NIC Teaming. Although you can team vNIC's within a VM, we are not going to discuss OS vNIC teaming, but rather physical NIC teaming. You may be wondering why someone would want to team physical NIC's? Well why not! Teaming the NIC's will not only eliminate the single point of failure associated with a single physical NIC, but also provide better overall network throughput - what's not to like!?!
ESX offers 3 different methods for load balancing. However, not all methods are created equal, and only one method offers true load distribution. The 3 load-balancing methods include:
ESX offers 3 different methods for load balancing. However, not all methods are created equal, and only one method offers true load distribution. The 3 load-balancing methods include:
- Route based on the originating port ID (this is the default if not defined otherwise) - Also know as vSwitch port-based load-balancing, this method chooses an uplink based on the virtual port where the traffic entered the virtual switch.
- Route based on source MAC hash - This method chooses an uplink based on a hash of the source Ethernet address.
- Route based on IP hash - This method chooses an uplink based on a hash of the source and destination IP address of each packet.
Wednesday, March 31, 2010
Performance Monitoring of LUN, HBA, VM & for Which Threshold values, you should show concern
The esxtop utility can be used to measure how much I/O is moving across various devices. The esxtop utility is interactive. As such, pressing certain keys changes the view.
Configuring monitoring using esxtop
To monitor storage performance per HBA:
- Start esxtop by typing esxtop at the command line.
- Press d to switch to disk view (HBA mode).
- Press f to modify the fields that are displayed.
- Press b, c, d, e, h, and j to toggle the fields and press Enter.
- Press s, then 2 to alter the update time to every 2 seconds and press Enter.
- See Analyzing esxtop columns for a description of relevant columns.
VMware ESXi 4 Log Files

Source : /www.simonlong.co.uk/blog/
Like most VI Admins, I've been using VMware ESXi quite a lot more lately and I'm slowly coming across things that are different to how they are in ESX. Log files being one of these differences.
With the absence of the Service Console, ESXi presents a slightly different architecture. If you haven't yet read The Architecture of VMware ESXi, I would recommend having a good read through.
Here is the common log file structure in ESX (Source)
Click below --> "Read More" for Full Article (Log File Geometry & Snippets)..
Online Training - How to Configure VMware dvPortGroup + Cisco Switch + Private VLAN IDs + Trunking
Source - www.NTpro.nl
Online Training - Configure Private VLAN IDs from Eric Sloof NTPRO.NL on Vimeo.
- This presentation will lead you trough configuring VLAN IDs at both the vSphere environment and on the physical Cisco switch.
- You’ll get a good understanding of trunking on a Cisco switch and dvPortGroup Settings.
- At the end you’re able to configure a Cisco switch using Cisco’s Network Assistant and understand the different dvPortGroup Settings.
Online Training - Configure Private VLAN IDs from Eric Sloof NTPRO.NL on Vimeo.
Cool new HA feature coming up to prevent a split brain situation! in ESX 4 Update 2
Source - www.yellow-bricks.com
One of the most common issues experienced with VMware HA is a split brain situation. Although currently undocumented, vSphere has a detection mechanism for these situations. Even more important the upcoming release ESX 4.0 Update 2 will also automatically prevent Split Brain of H.A!First let me explain what a split brain scenario is, lets start with describing the situation which is most commonly encountered:
4 Hosts – iSCSI / NFS based storage – Isolation response: leave powered on
When one of the hosts is completely isolated, including the Storage Network, the following will happen:
Host ESX001 is completely isolated including the storage network(remember iSCSI/NFS based storage!) but the VMs will not be powered off because the isolation response is set to “leave powered on”. After 15 seconds the remaining, non isolated, hosts will try to restart the VMs. Because of the fact that the iSCSI/NFS network is also isolated the lock on the VMDK will time out and the remaining hosts will be able to boot up the VMs. When ESX001 returns from isolation it will still have the VMX Processes running in memory. This is when you will see a “ping-pong” effect within vCenter, in other words VMs flipping back and forth between ESX001 and any of the other hosts.
As of version 4.0 ESX(i) detects that the lock on the VMDK has been lost and issues a question if the VM should be powered off or not. Please note that you will(currently) only see this question if you directly connect to the ESX host. Below you can find a screenshot of this question.
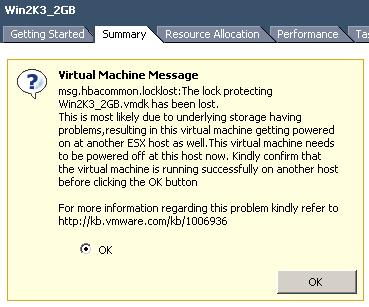
With ESX 4 update 2 the question will be auto-answered though and the VM will be powered off to avoid the ping-pong effect and a split brain scenario! How cool is that…
Re-Connect NFS Datastore without Restarting ESX Host (in case NFS Physical connection is lost & restored)
Try below VMware KB or another work around below..
(Ensure vmkping x.x.x.x) - where x.x.x.x is your NAS IP - is pinging
http://kb.vmware.com/selfservice/microsites/search.do?language=en_US&cmd=displayKC&externalId=1005057
Another workaround - below
NFS is a great storage solution within a VMware vSphere environment. But when the connection to the NFS server is lost, you’re in big trouble. In most circumstances some virtual machines are still connected to the NFS Datastore and since it’s in use, you cannot delete and recreate it. I’ve tried this by using the vSphere Client and trough the command line but didn’t succeed. In the end there’s no other alternative than rebooting the ESX host, or is there… If you want to find out how to remount an NFS Datastore you may watch below video. By Eric Sloof
Actual Trick is - NFS data store IP was x.x.x.x, he created a host name (using /etc/hosts file or DNS or alias host name on DNS) to fool the vCenter, then added host name when adding NFS source. vCenter thinks it's getting NFS from different Source..
May be it's a little dragging video, wait till end of video to see the insight
Monday, March 29, 2010
How to troubleshoot Pink Screen on Death (PSOD) in ESX
Source : VMware KB, VMworld PSOD Guide, TechTarget
VMware might not want to get into Blues like Microsoft much famed BSOD (Blue Screen on Death). So they named it as PSOD (Pink Screen on Death).. LOL..
As you know PSOD crash normally could have no shortcut to find the source of problem, VMware tried it's best to make to straight, possible PSOD causes as mentioned below
1) Hardware Faults
2) Host Faults
3) VMM Faults
4) Guest Operating System Faults
5) Application Faults
How to Capture the PSOD crash dump (By default PSOD dump is saved on /root)
1) type "vm-support" (on # Prompt) without any options. The utility will run and create a single Tar file that will be named "esx-xxxxxx..tgz".
2) Alternatively, you can generate the same file by using the VMware Infrastructure Client (VI Client). Select Administration, then Export Diagnostic Data, and select your host (VirtualCenter data optional) and a directory on your local PC to store the file that will be created.
You may follow these steps to resolve the issue
Click below --> "Read More" for Full Article
VMware might not want to get into Blues like Microsoft much famed BSOD (Blue Screen on Death). So they named it as PSOD (Pink Screen on Death).. LOL..
As you know PSOD crash normally could have no shortcut to find the source of problem, VMware tried it's best to make to straight, possible PSOD causes as mentioned below
1) Hardware Faults
2) Host Faults
3) VMM Faults
4) Guest Operating System Faults
5) Application Faults
How to Capture the PSOD crash dump (By default PSOD dump is saved on /root)
1) type "vm-support" (on # Prompt) without any options. The utility will run and create a single Tar file that will be named "esx-xxxxxx.
2) Alternatively, you can generate the same file by using the VMware Infrastructure Client (VI Client). Select Administration, then Export Diagnostic Data, and select your host (VirtualCenter data optional) and a directory on your local PC to store the file that will be created.
Click below --> "Read More" for Full Article
How CDP (Cisco Discovery Protocol) will benefit you to identify *** Which NIC connected to what External Device on ESX ***
Source : VMware KB and www.vmetc.com
This is a handy little trick, starting with version 3.5, VMware added support for Cisco Discovery Protocol (CDP) on the ESX Server vSwitches. CDP support is enabled on a vSwitch with this command:
Verify the current CDP setting for vSwitch2
ESX# esxcfg-vswitch -b vSwitch2
This is a handy little trick, starting with version 3.5, VMware added support for Cisco Discovery Protocol (CDP) on the ESX Server vSwitches. CDP support is enabled on a vSwitch with this command:
Verify the current CDP setting for vSwitch2
ESX# esxcfg-vswitch -b vSwitch2
down
The above output is down - which indicates CDP is currently not enabled vSwitch2 To enable CDP on vSwitch2
ESX# esxcfg-vswitch -B both vSwitch2
To Verify the CDP Status (Expect -> Down, Listen, Advertise, Both)
ESX# esxcfg-vswitch -b vSwitch2
Both
Check CDP information on Physical Switch
Once CDP support is enabled on the vSwitch & physical switch - execute below command on Phy.Switch. Which will show the link between each physical switch port and the matching ESX Server NIC. The output will look something like this:
# show cdp neighbor
Capability Codes: R-Router, T-Trans Bridge, B-Source Route Bridge
S-Switch, H-Host, I-IGMP, r-Repeater, P-Phone
DeviceID Local Intrfce Holdtme Capability Platform Port ID
s3 Gig 0/26 147 T S WS-C3524-XFas 0/24
esx04 Gig 0/22 168 S VMware ESXvmnic0
esx04 Gig 0/21 168 S VMware ESXvmnic1
As you can see in the output above, the CDP output clearly links the physical switch port and the ESX Server NIC. This makes it incredibly easy to identify the NICs in the server. This is particularly helpful in blade situations, since you can’t exactly unplug the NIC and see which one goes down with “esxcfg-nics -l” (a common approach to identifying the NICs in the server). Of course, this requires CDP switches in the blade chassis. Since the internal port mappings on the blade chassis determine which NICs connect to which ports, this command adds the mapping within ESX Server and lets us quickly and definitively identify the NICs in the server as seen by ESX Server.
Check CDP information in VI Client
Now, using the VI Client you can go to the Configuration tab of a host and select Networking. To the right of each vSwitch is what I’ll describe as a dialogue icon.

Clicking this Call out icon (Green circle) brings up the switch port info you are seeking.

VMDK Related - Simple Stuff - but good to read & keep in mind
I guess, you may use Mr.Mattr workaround (below) in other cases, like data recovery / repair file system times as well. - Source : www.breathalize.co.uk -
I was upgrading the memory in a Windows 2000 VM to 8GB, and had to alter the boot.ini to use more than 4GB. Unfortunately I was doing this remotely and during the save process my VPN died. When I rebooted the server I was faced with the dreaded ‘NTBTLDR.EXE is missing’.
Now I knew that the problem must lie with the boot.ini, but how to get at it? Because I was remote I did not have a Windows 2000 disk to get a recovery console up and I needed to get the server up and running again. I then realized that I did not need to boot from a CD to get to the VM’s hard drive.
I shut the VM off again, and switched to other VM on same host. In Edit Settings, I simply added the vmdk of the troubled VM to the other VM and rescanned for the disk in Disk Management. Lo and behold the disk appeared and I could access the boot.ini file – I had managed to add a space at the beginning of the file during the save process which was causing the problem.
I rectified the file, removed the disk from the spare server and then the vmdk from the client. I crossed my fingers and restarted the VM … and gratefully saw the windows splash screen appear. If this had been a physical box I would not have had a chance of fixing this remotely, and even on site there would have been much more time expended on finding a chassis with spare slots, array controller configurations etc. so it goes to show even the most basic functions of VMware are worth the effort of putting it in in the first place 
VMware ThinApp (Formerly Thinstall) - Application Virtualization
VMware ThinApp (formerly Thinstall) is an application virtualization and portable application creator suite by VMware that can package conventional applications so that they become portable applications.
Ex : Ms-Office is Conventional App - Requires Installation & Registry updates,
Ex : Putty.exe is Portable App - Portable app runs anywhere without actual
installation (may be from pen drive as well)
To make a straight cut, ThinApp will emulate Conventional Apps to
Portable Apps
VMware ThinApp is an application virtualization solution ThinApp is able to execute applications without them being installed in the traditional sense by virtualizing resources such as environment variables, files and Windows Registry keys. The virtual environment presented to the client is a merged view of the underlying physical and virtual resources, thereby allowing the virtualization layer to fool the application into thinking that it is running as if it were fully installed.
ThinApp Video Demo by VMware
All about VMware Data Recovery - Read on - Dont miss the video
VDR - VMware Data Recovery (My understanding as below)
What is VDR
VDR is a Backup & Recovery Appliance - Customized on Cent OS
(available from VMware as an OVF - Open Virtualization format)
You can download .OVF file & install from vSphere Client
(VM will be created automatically attached to your chosen Phy.ESX Host)
You can install VDR Plug-ins and execute Backup & Restore directly from vCenter, on any level of Infrastructure (entire Datacenter, Cluster or VM level)
Click below --> "Read More" for Full Article (Why VDR, Why not VDR & Demo Video)..
Sunday, March 28, 2010
Wow... Finally Up2date OS & Processor compatibility Matrix for VMware FT under one Umbrella - (Very crucial to sail with FT)
This is what I was looking for a while, instead of depending on 3rd party websites to check FT H/w & S/w certification matrix. Now VMware KB (link here) - providing a single window checklist
What I liked is - VMware keeps updating this KB article with latest Laundry List of H/w & S/w
Are you excited to know more on Brand new feature of VMware FT - Read my previous FT Blog - Click here
Need help on F.T implementation - reach me on HAIIAMPC at GMAIL dot com
What I liked is - VMware keeps updating this KB article with latest Laundry List of H/w & S/w
Are you excited to know more on Brand new feature of VMware FT - Read my previous FT Blog - Click here
Need help on F.T implementation - reach me on HAIIAMPC at GMAIL dot com
Why VMware Tools (VM Tools) on Guest OS is "Very Important" - be aware of the Significance, read on..
VM Tools will provide the below for Guest OS
- Drivers for Guest OS
- VmMemCtl - Memory Mgt Driver (Baloon mechanism)
- Heartbeat to Vcenter (Important for HA, DRS & FT)
- Guest OS Clock Sync from ESX (As Guest OS have Virtual Mother Board - no RTC. So, VM will Sync the time from ESX Host (Physical M.Brd RTC) Recommended to sync Guest OS time with ESX (Provided no Time Server on Guest OS)
- Mouse & Video Acceleration on Guest OS
--> VM tools installation in Windows & GUI of any Linux flavor
(while Guest OS is running, click VM Menu, install VM tools)
--> VM tools on CLI of Linux Flavors may follow KB Article from VMware
This video details installing VMware Tools in a Linux guest operating system using RPM (Red Hat Package Manager). This video uses VMware ESX 4.0, but the same basic steps apply to other products. The guest operating system in this video is CentOS, but the steps can be used in any Linux distribution that supports RPM.
How to install VMware Tools in a Linux virtual machine using RPM Method
(If you require help on Compile Method / for Novell Netware - reach me on HAIIAMPC at GMAIL dot COM)
VMware is the first to Provide Patch Mgt of Applications on VM's, Guest OS updates & Hypervisor Updates
Updating ESX / ESXi Host Patches, Guest OS Patches (Linux & Windows Service Pack and Patches) & Even amazingly Application Patches on your VM's (Be it Anti Virius or Enterprise Class App or Gaint DB s/w). VMware has tied up with www.shavlik.com to get end-to-end patch management via VMware Update Mgr.. I have experienced this first handed - wow, it's beautiful & great flexibility - Hats off to www.SHAVLIK.com & VMware - Few updates may require restart of Applications / Guest OS / ESX Host itself (keep an eye on Update Mgr wizards)
Below article Sourced from VMware Knowledge Base
We have a new video for you today detailing installing patches or updates to your VMware ESX host using VMware vCenter Update Manager. This video was created using ESX 4.0 and Update Manager 4.0. The same basic steps apply to other versions of ESX. This video also shows you how to determine how often your host checks for patches or updates, where to schedule the task, and how to run the task manually.
For more information and context, continue reading the KB article: Updating an ESX host using vCenter Update Manager.
Updating an ESX host using vCenter Update Manager
(Click - Watch on YouTube and then Full Screen for better clarity)
Restarting the Management agents on an ESX or ESXi Server (May Solve all below symptoms)
Symptoms / Problems
- Cannot connect ESX to VirtualCenter
- Cannot connect ESX to vCenter Server
- Cannot connect directly to ESX Server from the VMware Infrastructure Client
- Cannot connect directly to the ESX Server from the vSphere Client
- You cannot stop or start a virtual machine
- A virtual machine is shown as running in VirtualCenter when it is not
- VirtualCenter shows the error:
Virtual machine creation may fail because agent is unable to retrieve VM creation options from the host
Purpose
For troubleshooting purposes, it may be necessary to restart the management agents on your ESX Server. This article provides you with the steps to restart the management agents (mgmt-vmware and vmware-vpxa) directly on ESX or ESXi.
This article applies ESX 3 and ESX 4, as well as ESXi 3 and ESXi 4.
Caution: Restarting the management agents may impact any tasks that may be running on the ESX or ESXi host at the time of the restart. For more information about identifying tasks running on an ESX or ESXi host, see Collecting information about tasks in VMware ESX and ESXi (1013003).
Resolution :
Click below --> "Read More" for Full Article (How to restart Mgt agent on ESX & ESXi)..
Discover iSCSI SAN LUN on ESX via CLI - As easy as you count 1,2,3 (assumes SAN admin mapped LUN to ESX Host & VMkernel port ready on ESX)
The command vmkiscsi-tool. Really good stuff, I can complete the rest of my setup without the GUI. One thing though to list out the iqn for iscsi after you enable it you must know the device name (ie vmhba??). Using this command:
# vmkiscsi-tool -I -l I usually guess the iscsi hba is vmhba33 or 32 but how do I know for sure? Try:
# esxcfg-scsidevs -a

Ok great, now we know it is vmhba33 (Click the above image for full details as well)
[root@esxhost01 sbin]# vmkiscsi-tool -I -l vmhba33
iSCSI Node Name: iqn.1998-01.com.vmware:esxhost01-35151883
[root@esxhost01 sbin]#Now with a few more vmkiscsi-tool commands I can finish configuring my iSCSI.
Add the Ip of the SAN:
[root@esxhost01 sbin]# vmkiscsi-tool -D -a 172.16.23.251 vmhba33
Now rescan:
[root@esxhost01 sbin]# esxcfg-rescan -a vmhba33
Xsigo - I/O Virtualization - How VMware & VMware customers can benefit on this (of course other OS also can benefit - Below video on VMware)
*Disclaimer - (content sources are from public display of respective of vendors)
I made a small Presentation on Xsigo, you may take a look at it - Click to download
Xsigo will enables you to have a single 20 Gbps I/O Card on Server
(which provides Virtual NIC, V FC HBA, V iSCSI HBA or any legacy I/O Card) to OS. Hence users need not have look for Physical Compatible slots, cards and additional cabling on server rack.. That's awesome - we don't need to open Server, not required to make make your hands dirty, no downtime negotiations with stake holders - everything is on-the-fly (while OS is up & running - I can present any virtual PCI Card to OS) - today Project requirement is SCSI, tomorrow iSCSI, then FC, then FCOE - don't worry - one Xsigo Card will provide any virtual PCI card to OS.
One card and one cable will be connected to VP780 I/O Director - which provides Virtually every Card to Server.. You may read more about this @ below link..
Good news is --> Gaint OEM vendor "Dell" is Xsigo Partner as well
Good news is --> Gaint OEM vendor "Dell" is Xsigo Partner as well
I made a small Presentation on Xsigo, you may take a look at it - Click to download
Changing VirtualCenter log locations
LoDuring the initial setup of vCenter, you might have chosen LOG file location to default, which in turn may fill your OS Drive and cause the bottleneck to vCenter OS performance in future..
It's advised to change the vCenter LOG file location to different (not OS partition) & let the OS breathe..
By default (Windows 2003) log files are stored in “C:\Documents and Settings\All Users\Application Data\VMware\VMware VirtualCenter\Logs”, and for Windows 2008 log files are stored in “C:\ProgramData\VMware\VMware VirtualCenter\Logs”.
Resolution
Source VMware KB - 1009145 - Link here
Saturday, March 27, 2010
VMware announced vSphere 4.0 Hardening Guide Public Draft Release
Source : VMware Security Blog
VMware would like to announce the availability of a public draft for the vSphere 4.0 Security Hardening Guide. This guide represents a new approach to providing security guidance from VMware. As compared with the previous VI3 Hardening Guides, the current guide has the following highlights
VMware would like to announce the availability of a public draft for the vSphere 4.0 Security Hardening Guide. This guide represents a new approach to providing security guidance from VMware. As compared with the previous VI3 Hardening Guides, the current guide has the following highlights
- Structure: this version uses a standardized format, with formally defined sections, templates, and reference codes. The goal is to increase clarity and reduce ambiguity, make it easier to reference individual guidelines, and most of all, enhance the ability to automate guideline enforcement.
- Recommendation levels: in following with the formats used by NIST, CIS, and others, this guide categorizes all guidelines into three security levels. Instead of recommending a single set of guidelines for all environments, this guide encourages more of a risk-based approach, so that individual administrators can decide which guidelines apply to their environment.
- vSphere 4.0 Security Hardening Guide: Introduction (REV B)
- vSphere 4.0 Security Hardening Guide: Virtual Machines (REV B)
- vSphere 4.0 Security Hardening Guide: Hosts (REV B)
- vSphere 4.0 Security Hardening Guide: vNetwork (REV B)
- vSphere 4.0 Security Hardening Guide: vCenter (REV B)
- vSphere 4.0 Security Hardening Guide: COS (REV B)
Howmany VCP's are there in Market till now? and New VMware VCP Logo Released

Article Source : www.simonlong.co.uk
As you can see VMware now have a new VCP Logo. The new VCP logo has been placed out on the VCP section of the Website for you to download.
Some other VCP news from VMware:
We currently have over 53,000 VCPs, of which over 15,000 are VCP4s. The second number is rapidly increasing since the launch of the VCP4 certification in the 3rd quarter of 2009. Think about it, 6 months into the certification and we already have 15,000 VCP4s!With that many VCP's I think it's about time I started working towards my VCDX Exams.
While changing Preferred Path on Storage Adapter --> Unable to cast object of type ‘LogicalUnitPolicy’ to type ‘FixedLogicalUnitPolicy’

Source - http://www.simonlong.co.uk/
When trying to change the Preferred Path on Storage Adapter I was greeted with the following Error message
Unable to cast object of type ‘LogicalUnitPolicy’ to type ‘FixedLogicalUnitPolicy’I checked my other Storage Adapters and these too gave me the same error.
The Fix
To fix this problem all you need to do is Rescan the Storage Adaptors using the following steps
- In the vSphere Client, select the Host which has the Storage Adaptors that are giving you the error and click the Configuration tab.
- In the Hardware panel, select Storage Adapters
- Select one of your Storage Adaptors and click Rescan above the Storage Adapters panel.
- Perform Step 3 for the rest of your Storage Adapters.
Subscribe to:
Comments (Atom)

