Friday, April 2, 2010

VMware vCenter Mobile Access (vCMA) - Allow to Manage Vsphere Infrastructure from Mobie.. Yes, You heard it Right!

VMware vCenter Mobile Access (vCMA) - vCMA allows you to monitor and manage VMware Infrastructure from your mobile phone with an interface that is optimized for such devices. Specifically, it allows you to:
  • Search for virtual machines in your data center
  • Migrate virtual machines from one host to another using vMotion
  • Execute recovery plans using VMware Site Recovery Manager
  • Access Scheduled Tasks, Alarms and Events
And much more..


Installation Procedure & Packaging

The vCenter Mobile Access server is packaged as a virtual appliance. The username/password on the appliance is root/vmware but console access should not be required. The root password should be changed after install.

Download the vCMA OVF distribution zip file from this link (the file is approximately 350 megabytes). The zip file contains the appliance OVF file and other system files.


Follow these steps to install the Mobile Access appliance:

1. Extract the zip file to a temporary directory, for example c:\temp. The files contained in the zip file include :
* vCenterMobileAccess-1.x.y.z.ovf
* system.vmdk
2. Launch the VI Client and log into your ESX box or vCenter instance.
3. In the inventory view, select the menu File-> Virtual Appliance -> Import…
4. Select the option “Import from file:” and browse to the OVF file, for example: c:\temp\vCenterMobileAccess-ovf\vCenterMobileAccess-1.0.0.10.ovf and follow the wizard next steps.
5. In the “End User License Agreement” page, read the license agreement completely and click on the “Accept all license agreements” and continue the steps.
6. In the “Name and Location” page, provide the name for your Virtual Machine.
7. Once the wizard completes, a virtual machine will be created. Select the virtual machine and power it on.

Open your local browser (http://IP Address of vCMA:5480)

On your mobile http:///vim

Once connected, you will see the login screen where you can provide the vCenter or ESX IP address or name as well as username and password.

Thursday, April 1, 2010

Feature Compare vSwitch 3.5, vSwitch 4.0, dVswitch 4.0, Cisco Nexus 1000

The following Table is a list of the key features of VMware vNetwork Distributed Switch. For a comprehensive list of VMware vSphere features download the key features summary.

Simplify and Enhance Virtual Machine Networking

  • Simplified provisioning and administration of virtual networking across many hosts and clusters through a centralized interface.
  • Simplified end-to-end physical and virtual network management through third-party virtual switch extensions for the Cisco Nexus 1000V virtual switch.
  • Enhanced provisioning and traffic management capabilities through private VLAN support and bi-directional virtual machine rate-limiting.
  • Enhanced security and monitoring for virtual machines migrated via VMware VMotion through maintenance and migration of port runtime state.
Click below --> Read More for Full Article..

Load-balancing Methods (I prefer to call Teaming Methods) --> 1) Originating Port ID Based 2) MAC Hash Based 3) IP Hash Based - Which is best, in real & what supports Actual Load Balance????

Now that we understand the basics, we will move on to the topic at hand, NIC Teaming. Although you can team vNIC's within a VM, we are not going to discuss OS vNIC teaming, but rather physical NIC teaming. You may be wondering why someone would want to team physical NIC's? Well why not! Teaming the NIC's will not only eliminate the single point of failure associated with a single physical NIC, but also provide better overall network throughput - what's not to like!?!

ESX offers 3 different methods for load balancing. However, not all methods are created equal, and only one method offers true load distribution. The 3 load-balancing methods include:
  • Route based on the originating port ID (this is the default if not defined otherwise) - Also know as vSwitch port-based load-balancing, this method chooses an uplink based on the virtual port where the traffic entered the virtual switch.
  • Route based on source MAC hash - This method chooses an uplink based on a hash of the source Ethernet address.
  • Route based on IP hash - This method chooses an uplink based on a hash of the source and destination IP address of each packet.
Click below --> Read More for Full Article (Which one will give Real Load Balancing)

Wednesday, March 31, 2010

Performance Monitoring of LUN, HBA, VM & for Which Threshold values, you should show concern

The esxtop utility can be used to measure how much I/O is moving across various devices. The esxtop utility is interactive. As such, pressing certain keys changes the view.

Configuring monitoring using esxtop


To monitor storage performance per HBA:
  1. Start esxtop by typing esxtop at the command line.
  2. Press d to switch to disk view (HBA mode).
  3. Press f to modify the fields that are displayed.
  4. Press b, c, d, e, h, and j to toggle the fields and press Enter.
  5. Press s, then 2 to alter the update time to every 2 seconds and press Enter.
  6. See Analyzing esxtop columns for a description of relevant columns.
 Click below --> "Read More" for Full Article (Tolerable Threshold Values in Real time)..


VMware ESXi 4 Log Files


Source : /www.simonlong.co.uk/blog/

Like most VI Admins, I've been using VMware ESXi quite a lot more lately and I'm slowly coming across things that are different to how they are in ESX. Log files being one of these differences.
With the absence of the Service Console, ESXi presents a slightly different architecture. If you haven't yet read The Architecture of VMware ESXi, I would recommend having a good read through.
Here is the common log file structure in ESX (Source)

 Click below --> "Read More" for Full Article (Log File Geometry & Snippets)..

Online Training - How to Configure VMware dvPortGroup + Cisco Switch + Private VLAN IDs + Trunking

Source - www.NTpro.nl

  • This presentation will lead you trough configuring VLAN IDs at both the vSphere environment and on the physical Cisco switch.
  • You’ll get a good understanding of trunking on a Cisco switch and dvPortGroup Settings.
  • At the end you’re able to configure a Cisco switch using Cisco’s Network Assistant and understand the different dvPortGroup Settings.
Below Video is about for 40 minutes.  (right click on video for Full Screen)


Online Training - Configure Private VLAN IDs from Eric Sloof NTPRO.NL on Vimeo.

Cool new HA feature coming up to prevent a split brain situation! in ESX 4 Update 2

Source - www.yellow-bricks.com

One of the most common issues experienced with VMware HA is a split brain situation. Although currently undocumented, vSphere has a detection mechanism for these situations. Even more important the upcoming release ESX 4.0 Update 2 will also automatically prevent Split Brain of H.A!

First let me explain what a split brain scenario is, lets start with describing the situation which is most commonly encountered:

4 Hosts – iSCSI / NFS based storage – Isolation response: leave powered on

When one of the hosts is completely isolated, including the Storage Network, the following will happen:
Host ESX001 is completely isolated including the storage network(remember iSCSI/NFS based storage!) but the VMs will not be powered off because the isolation response is set to “leave powered on”. After 15 seconds the remaining, non isolated, hosts will try to restart the VMs. Because of the fact that the iSCSI/NFS network is also isolated the lock on the VMDK will time out and the remaining hosts will be able to boot up the VMs. When ESX001 returns from isolation it will still have the VMX Processes running in memory. This is when you will see a “ping-pong” effect within vCenter, in other words VMs flipping back and forth between ESX001 and any of the other hosts.

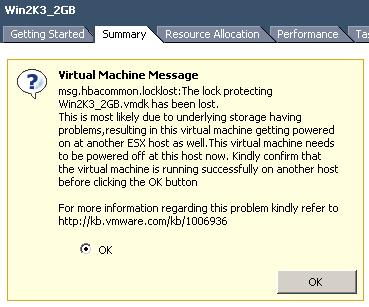
As of version 4.0 ESX(i) detects that the lock on the VMDK has been lost and issues a question if the VM should be powered off or not. Please note that you will(currently) only see this question if you directly connect to the ESX host. Below you can find a screenshot of this question.


With ESX 4 update 2 the question will be auto-answered though and the VM will be powered off to avoid the ping-pong effect and a split brain scenario! How cool is that

Re-Connect NFS Datastore without Restarting ESX Host (in case NFS Physical connection is lost & restored)

Try below VMware KB  or another work around below..
(Ensure vmkping x.x.x.x) - where x.x.x.x is your NAS IP - is pinging

http://kb.vmware.com/selfservice/microsites/search.do?language=en_US&cmd=displayKC&externalId=1005057


Another workaround - below

NFS is a great storage solution within a VMware vSphere environment. But when the connection to the NFS server is lost, you’re in big trouble. In most circumstances some virtual machines are still connected to the NFS Datastore and since it’s in use, you cannot delete and recreate it. I’ve tried this by using the vSphere Client and trough the command line but didn’t succeed. In the end there’s no other alternative than rebooting the ESX host, or is there… If you want to find out how to remount an NFS Datastore you may watch below video. By Eric Sloof

Actual Trick is - NFS data store IP was x.x.x.x, he created a host name (using /etc/hosts file or DNS or alias host name on DNS) to fool the vCenter, then added host name when adding NFS source. vCenter thinks it's getting NFS from different Source..

May be it's a little dragging video, wait till end of video to see the insight

Monday, March 29, 2010

How to troubleshoot Pink Screen on Death (PSOD) in ESX

Source : VMware KB, VMworld PSOD Guide, TechTarget

VMware might not want to get into Blues like Microsoft much famed BSOD (Blue Screen on Death). So they named it as PSOD (Pink Screen on Death).. LOL..

As you know PSOD crash normally could have no shortcut to find the source of problem, VMware tried it's best to make to straight, possible PSOD causes as mentioned below

1) Hardware Faults
2) Host Faults
3) VMM Faults
4) Guest Operating System Faults
5) Application Faults

  How to Capture the PSOD crash dump (By default PSOD dump is saved on /root)

1) type "vm-support" (on # Prompt) without any options. The utility will run and create a single Tar file that will be named  "esx-xxxxxx..tgz".

2) Alternatively, you can generate the same file by using the VMware Infrastructure Client (VI Client). Select  Administration, then Export Diagnostic Data, and select your host (VirtualCenter data optional) and a directory on your local PC to store the file that will be created. 


You may follow these steps to resolve the issue

 Click below --> "Read More" for Full Article

How CDP (Cisco Discovery Protocol) will benefit you to identify *** Which NIC connected to what External Device on ESX ***

Source : VMware KB and www.vmetc.com 
 

This is a handy little trick, starting with version 3.5, VMware added support for Cisco Discovery Protocol (CDP) on the ESX Server vSwitches. CDP support is enabled on a vSwitch with this command:

Verify the current CDP setting for vSwitch2
ESX# esxcfg-vswitch -b vSwitch2 

down 
The above output is down - which indicates CDP is currently not enabled vSwitch2  

To enable CDP on vSwitch2
ESX# esxcfg-vswitch -B both vSwitch2

To Verify the CDP Status (Expect -> Down, Listen, Advertise, Both)
ESX# esxcfg-vswitch -b vSwitch2


Both

Check CDP information on Physical Switch

Once CDP support is enabled on the vSwitch & physical switch - execute below command on Phy.Switch. Which will show the link between each physical switch port and the matching ESX Server NIC. The output will look something like this:

# show cdp neighbor 

 Capability Codes: R-Router, T-Trans Bridge, B-Source Route Bridge
                  S-Switch, H-Host, I-IGMP, r-Repeater, P-Phone

DeviceID  Local Intrfce  Holdtme  Capability  Platform      Port ID
s3        Gig   0/26        147      T S    WS-C3524-XFas 0/24
esx04     Gig   0/22        168       S     VMware        ESXvmnic0
esx04     Gig   0/21        168       S     VMware        ESXvmnic1

As you can see in the output above, the CDP output clearly links the physical switch port and the ESX Server NIC. This makes it incredibly easy to identify the NICs in the server. This is particularly helpful in blade situations, since you can’t exactly unplug the NIC and see which one goes down with “esxcfg-nics -l” (a common approach to identifying the NICs in the server). Of course, this requires CDP switches in the blade chassis. Since the internal port mappings on the blade chassis determine which NICs connect to which ports, this command adds the mapping within ESX Server and lets us quickly and definitively identify the NICs in the server as seen by ESX Server.

Check CDP information in VI Client

Now, using the VI Client you can go to the Configuration tab of a host and select Networking. To the right of each vSwitch is what I’ll describe as a dialogue icon.

Clicking this Call out icon (Green circle) brings up the switch port info you are seeking.

VMDK Related - Simple Stuff - but good to read & keep in mind

I guess, you may use Mr.Mattr workaround (below) in other cases, like data recovery / repair file system times as well. - Source : www.breathalize.co.uk -

I was upgrading the memory in a Windows 2000 VM to 8GB, and had to alter the boot.ini to use more than 4GB. Unfortunately I was doing this remotely and during the save process my VPN died. When I rebooted the server I was faced with the dreaded ‘NTBTLDR.EXE is missing’. 

Now I knew that the problem must lie with the boot.ini, but how to get at it? Because I was remote I did not have a Windows 2000 disk to get a recovery console up and I needed to get the server up and running again. I then realized that I did not need to boot from a CD to get to the VM’s hard drive.

I shut the VM off again, and switched to other VM on same host. In Edit Settings, I simply added the vmdk of the troubled VM to the other VM and rescanned for the disk in Disk Management. Lo and behold the disk appeared and I could access the boot.ini file – I had managed to add a space at the beginning of the file during the save process which was causing the problem.

I rectified the file, removed the disk from the spare server and then the vmdk from the client. I crossed my fingers and restarted the VM … and gratefully saw the windows splash screen appear. If this had been a physical box I would not have had a chance of fixing this remotely, and even on site there would have been much more time expended on finding a chassis with spare slots, array controller configurations etc. so it goes to show even the most basic functions of VMware are worth the effort of putting it in in the first place :) 

VMware ThinApp (Formerly Thinstall) - Application Virtualization

VMware ThinApp (formerly Thinstall) is an application virtualization and portable application creator suite by VMware  that can package conventional applications so that they become portable applications.

Ex   :  Ms-Office is Conventional App - Requires Installation & Registry updates, 
Ex   :  Putty.exe is Portable App - Portable app runs anywhere without actual 
          installation (may be from pen drive as well)
          
          To make a straight cut, ThinApp will emulate  Conventional Apps to 
          Portable Apps

VMware ThinApp is an application virtualization solution ThinApp is able to execute applications without them being installed in the traditional sense by virtualizing resources such as environment variables, files and Windows Registry keys. The virtual environment presented to the client is a merged view of the underlying physical and virtual resources, thereby allowing the virtualization layer to fool the application into thinking that it is running as if it were fully installed.

ThinApp Video Demo by VMware

All about VMware Data Recovery - Read on - Dont miss the video

VDR  - VMware Data Recovery (My understanding as below)

What is VDR

VDR is a Backup & Recovery Appliance - Customized on Cent OS
(available from VMware as an OVF - Open Virtualization format)
You can download .OVF file & install from vSphere Client
(VM will be created automatically attached to your chosen Phy.ESX Host) 
You can install VDR Plug-ins and execute Backup & Restore directly from vCenter, on any level of Infrastructure (entire Datacenter, Cluster or VM level)

 Click below --> "Read More" for Full Article (Why VDR, Why not VDR & Demo Video)..


Sunday, March 28, 2010

Wow... Finally Up2date OS & Processor compatibility Matrix for VMware FT under one Umbrella - (Very crucial to sail with FT)

This is what I was looking for a while, instead of depending on 3rd party websites to check FT H/w & S/w certification matrix. Now VMware KB (link here) - providing a single window checklist


What I liked is - VMware keeps updating this KB article with latest Laundry List of H/w & S/w

Are you excited to know more on Brand new feature of VMware FT - Read my previous FT Blog - Click  here
Need help on F.T implementation - reach me on HAIIAMPC at GMAIL dot com

Why VMware Tools (VM Tools) on Guest OS is "Very Important" - be aware of the Significance, read on..

VM Tools will provide the below for Guest OS

  • Drivers for Guest OS 
  • VmMemCtl  - Memory Mgt Driver (Baloon mechanism)
  • Heartbeat to Vcenter (Important for HA, DRS & FT)
  • Guest OS Clock Sync from ESX (As Guest OS have Virtual Mother Board - no RTC. So, VM will Sync the time from ESX Host (Physical M.Brd RTC) Recommended to sync Guest OS time with ESX (Provided no Time Server on Guest OS)
  • Mouse & Video Acceleration  on Guest OS
--> VM tools installation in Windows & GUI of any Linux flavor       
      (while Guest OS is running, click VM Menu, install VM tools)
 
--> VM tools on CLI of Linux Flavors may follow KB Article from VMware

This video details installing VMware Tools in a Linux guest operating system using RPM (Red Hat Package Manager). This video uses VMware ESX 4.0, but the same basic steps apply to other products. The guest operating system in this video is CentOS, but the steps can be used in any Linux distribution that supports RPM. 

How to install VMware Tools in a Linux virtual machine using RPM Method
(If you require help on Compile Method / for Novell Netware - reach me on  HAIIAMPC at GMAIL dot COM)


VMware is the first to Provide Patch Mgt of Applications on VM's, Guest OS updates & Hypervisor Updates

Updating ESX / ESXi Host Patches, Guest OS Patches (Linux & Windows Service Pack and Patches) & Even amazingly Application Patches on your VM's (Be it Anti Virius or Enterprise Class App or Gaint DB s/w). VMware has tied up with www.shavlik.com to get end-to-end patch management via VMware Update Mgr.. I have experienced this first handed - wow, it's beautiful & great flexibility - Hats off to www.SHAVLIK.com & VMware - Few updates may require restart of Applications / Guest OS / ESX Host itself (keep an eye on Update Mgr wizards)

Below article Sourced from VMware Knowledge Base

We have a new video for you today detailing installing patches or updates to your VMware ESX host using VMware vCenter Update Manager. This video was created using ESX 4.0 and Update Manager 4.0. The same basic steps apply to other versions of ESX. This video also shows you how to determine how often your host checks for patches or updates, where to schedule the task, and how to run the task manually.

For more information and context, continue reading the KB article: Updating an ESX host using vCenter Update Manager.
Updating an ESX host using vCenter Update Manager
(Click - Watch on YouTube and then Full Screen for better clarity)

Restarting the Management agents on an ESX or ESXi Server (May Solve all below symptoms)

Symptoms / Problems 

  • Cannot connect ESX to VirtualCenter
  • Cannot connect ESX to vCenter Server
  • Cannot connect directly to ESX Server from the VMware Infrastructure Client
  • Cannot connect directly to the ESX Server from the vSphere Client
  • You cannot stop or start a virtual machine
  • A virtual machine is shown as running in VirtualCenter when it is not
  • VirtualCenter shows the error:


    Virtual machine creation may fail because agent is unable to retrieve VM creation options from the host

Purpose 

For troubleshooting purposes, it may be necessary to restart the management agents on your ESX Server. This article provides you with the steps to restart the management agents (mgmt-vmware and vmware-vpxa) directly on ESX or ESXi.


This article applies ESX 3 and ESX 4, as well as ESXi 3 and ESXi 4.
Caution: Restarting the management agents may impact any tasks that may be running on the ESX or ESXi host at the time of the restart. For more information about identifying tasks running on an ESX or ESXi host, see Collecting information about tasks in VMware ESX and ESXi (1013003).

Resolution :

Click below --> "Read More" for Full Article (How to restart Mgt agent on ESX & ESXi)..

Discover iSCSI SAN LUN on ESX via CLI - As easy as you count 1,2,3 (assumes SAN admin mapped LUN to ESX Host & VMkernel port ready on ESX)


The command vmkiscsi-tool. Really good stuff, I can complete the rest of my setup without the GUI. One thing though to list out the iqn for iscsi after you enable it you must know the device name (ie vmhba??). Using this command:

# vmkiscsi-tool -I -l

I usually guess the iscsi hba is vmhba33 or 32 but how do I know for sure? Try:
# esxcfg-scsidevs -a
esxcfg-scsidevs-a
Ok great, now we know it is vmhba33 (Click the above image for full details as well)

[root@esxhost01 sbin]# vmkiscsi-tool -I -l vmhba33


iSCSI Node Name: iqn.1998-01.com.vmware:esxhost01-35151883
 

[root@esxhost01 sbin]#

Now with a few more vmkiscsi-tool commands I can finish configuring my iSCSI.

Add the Ip of the SAN:
[root@esxhost01 sbin]# vmkiscsi-tool -D -a 172.16.23.251 vmhba33

Now rescan:
[root@esxhost01 sbin]# esxcfg-rescan -a vmhba33

Xsigo - I/O Virtualization - How VMware & VMware customers can benefit on this (of course other OS also can benefit - Below video on VMware)

 *Disclaimer - (content sources are from public display of respective of vendors)

Xsigo will enables you to have a single 20 Gbps I/O Card on Server
(which provides Virtual NIC, V FC HBA, V iSCSI HBA or any legacy I/O Card) to OS. Hence users need not have look for Physical Compatible slots, cards and additional cabling on server rack.. That's awesome - we don't need to open Server, not required to make make your hands dirty, no downtime negotiations with stake holders - everything is on-the-fly (while OS is up & running - I can present any virtual PCI Card to OS) - today Project requirement is SCSI, tomorrow iSCSI, then FC, then FCOE - don't worry - one Xsigo Card will provide any virtual PCI card to OS.

One card and one cable will be connected to VP780 I/O Director - which provides Virtually every Card to Server.. You may read more about this @ below link.. 
Good news is  --> Gaint OEM vendor "Dell" is Xsigo Partner as well


I made a small Presentation on Xsigo, you may take a look at it - Click to download

Changing VirtualCenter log locations

LoDuring the initial setup of vCenter, you might have chosen LOG file location to default, which in turn may fill your OS Drive and cause the bottleneck to vCenter OS performance in future..
It's advised to change the vCenter LOG file location to different (not OS partition) & let the OS breathe..

By default (Windows 2003) log files are stored in “C:\Documents and Settings\All Users\Application Data\VMware\VMware VirtualCenter\Logs”, and for Windows 2008 log files are stored in “C:\ProgramData\VMware\VMware VirtualCenter\Logs”.

Purpose 
This article provides steps to change the location in which VirtualCenter logs are kept.

Resolution 

Source VMware KB - 1009145 - Link here